
This page provides information about the import of custom rigged animable models with Chaos Anima.
Setting up the FBX
As the FBX format specification can have problems recognizing the shaders from some renderers (V-Ray, Corona, Arnold, Redshift, etc.), the best way to ensure the compatibility and export correctly all the textures used in the model is to apply only basic standard shaders before exporting the FBX from your application (3ds Max, Maya, Cinema 4D, Blender, etc.).
Also, to avoid problems with the paths of the textures, it’s recommended to use the option “embed media” that includes all the textures inside the FBX itself.
Keep in mind that this “standard shader” configuration used on the FBX won’t affect in any way the capabilities of our Anima plugins to adapt the shaders of the actors to any Render Engine that you may have selected on your 3D application. Don’t worry, that will still happen, this is only to get all the textures used in the models to be recognized correctly by the FBX exporter first and then by Anima too.
If your model is animated, it is recommended that the first frame of the animation has your model in a T-pose or A-pose. Then, select the option to “bake” animation and export only 1 frame, the first one, because in this article we explain how to import only the Rigged and skinned meshes into Anima, not the animation.
To import the animation included in an FBX, read the article Import Motion Clips (Animations).
Import Your Own Rigged Models
The import process for the Rigged models is almost the same than for the Posed models (which is explained in the article Import Posed models), but it has a few important differences that will help you define how Anima must use the information about the bone structure included in the source FBX file.
1. Open the Project for new Characters and change the Anima UI Mode to Editing Mode.
2. In the Actors Library, at the Project tab click the [+] button on the right side to start the import process.

3. The Import Actor dialog will open. Click on the Input File three little dots on the right side of the filename field and browse to the FBX file of your model.
4. Select the file units to match your project units and the maximum texture quality of the model that you want to set.
5. Choose the Bind Pose that you want to use as a pose reference to try to match the skeleton of your model with the standard Anima skeleton. The bind pose definition can have a huge impact on the correct interpretation of the rig by the importer. The rule of thumb is: the more the FBX bind pose matches the standard Anima bind pose, the better the Anima rig will adapt to the imported FBX model.
There are 2 options:
- Auto: This will detect if your FBX file includes a bind pose definition. If it’s not found, Anima will use the pose of the model as it is in the first frame of the animation included in the file. The presence of a bind pose definition depends on how the FBX was created. As it is not required in the FBX standard, it may or may not be included depending on the Software and the export parameters used to make it.
- First Frame: This will ignore any bind pose definition included in the FBX and will force the use of the first frame of the animation included in the file as the bind pose. This parameter was introduced to be able to easily define a customized bind pose in Softwares whose FBX exporter does not include any option to customize it (like 3ds Max). As said before, a customized bind pose that matches the standard Anima bind pose can help a lot to avoid import problems.
6. Select if you want the importer to keep the FBX model orientation as it is (Automatic rotation: NO), or try to automatically detect the best initial orientation for Anima based on the rotations and movements of the animation stored in the file (Automatic rotation: YES). The default option (YES) will work fine in most situations.

7. Click IMPORT to start the rig matching process.
At this point, the importer will read the mesh and the texture information from the FBX file and then will try to adapt the Anima skeleton to the one included used by the model. To do that, it will read the bone structure of the FBX model, and if it is already known, Anima will show you a dialog like this one:

In this particular case, the bone structure detected is compatible with the one named “Mixamo_A” that we already provide with Anima. We currently detect several rig structures from third-party companies, and we add more to the list on every Anima update.
However, if you don’t want to use the recommended preset or maybe you want to make a modification to the one detected, you can cancel that (click “x”) and the Bone Matching window will be shown. It will also appear directly if the bone structure of your model does not match any of the existing presets. Please refer to the Bone Matching section below for further information on how to use this dialog.
When the Bone Matching information is submitted, the importer will start to transfer the weights of the skin deformer from your FBX model to the rig inside Anima and, after that, a series of optimizations will be applied to maximize the mesh deformation quality and the real-time viewport performance. All this process is 100% automatic.
Once it finishes, you can review the result of the process by scrolling the LOG section here:
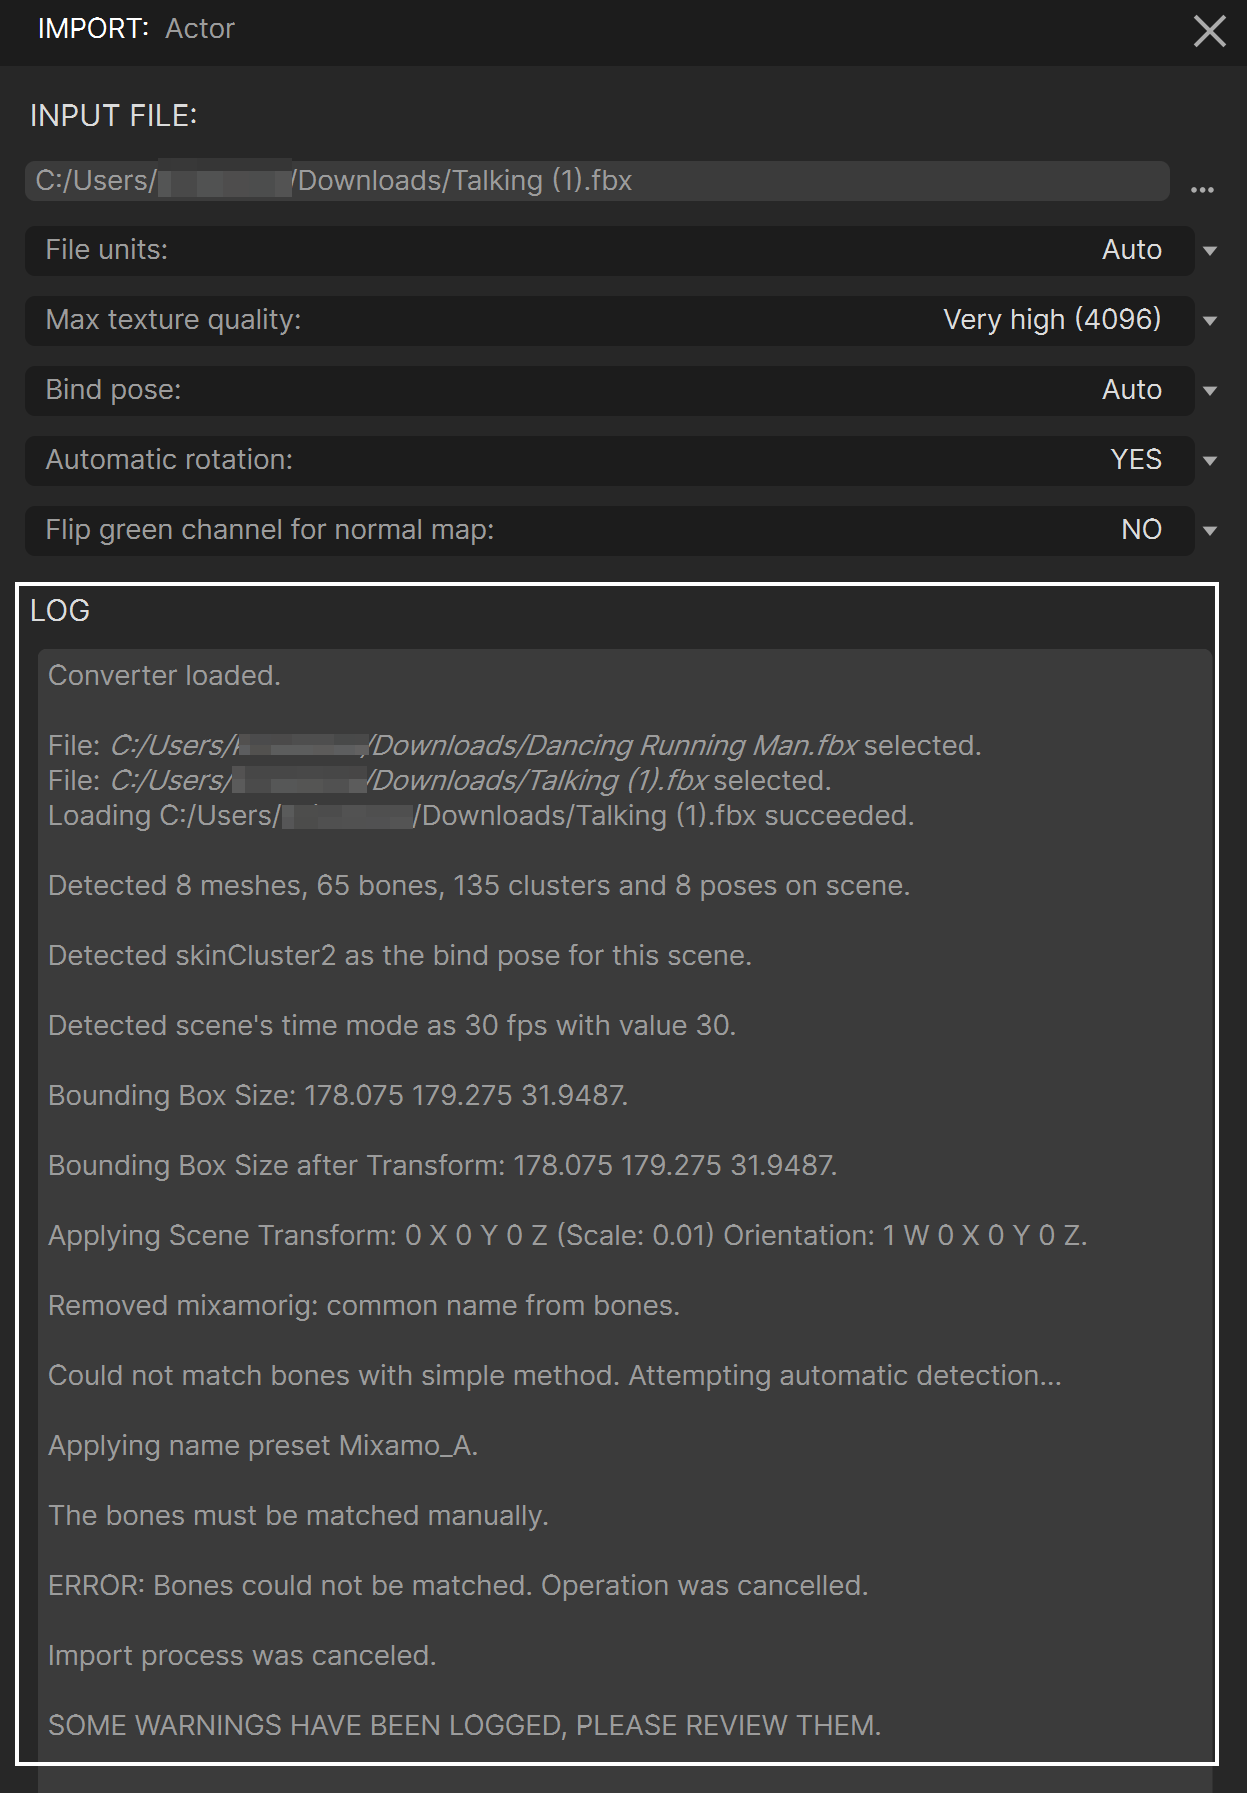
You’ll probably get some warnings in the LOG, but that’s okay, most of the time they are related to the texture size not being standard, and that won’t be a problem.
Now, your brand new Rigged character will be available in the Actors Library, at the Projects section, and you will be able to see your model in the 3D Viewport of the Editing Mode.

New characters don’t have a thumbnail yet. To generate one, go to the Actor Information panel and click the snapshot button ![]() to create it. On this panel, you can also add a Description, edit the Name, the Height or even set up the material types or the color variations.
to create it. On this panel, you can also add a Description, edit the Name, the Height or even set up the material types or the color variations.
You can add TAGs to your actor to keep your library organized and easily find it later using the search box of the Actors panel. More info about this on the following article Using Categories and Tags.

Click Save when you’re done to commit your changes. Now the thumbnail and the description will appear on the Projects section of the actor library, and your new character will be ready to use for any scene in the project with a simple drag & drop.

Use the Imported Model on all Projects
All the imported models are placed inside the library of your current Anima project (in the subfolder “<my_project>/libraries/models”). Once you finish importing this new static model, a new file with that name and the Anima native format extension (*.y) will be created there.
To make this file available to all your projects, copy this Anima file into the “models” subfolder of the “Purchases” folder that you have set up in Anima Preferences.
