
This page provides information on the LightMix, its settings and usage.
Overview
Interactive LightMix lets you adjust the intensity and color of your lights and light-emitting materials during and after render – perfect for anything from subtle adjustments to turning day into night directly from the Corona VFB. LightMix can be used on Corona EXR files outside of any 3D software using the Corona Image Editor.
Where to find the LightMix?
Set up from Corona toolbar
The quickest way to access LightMix is through the Corona toolbar:

LightMix can also be set from the Render Settings, and manually.
Set up LightMix from Render Settings
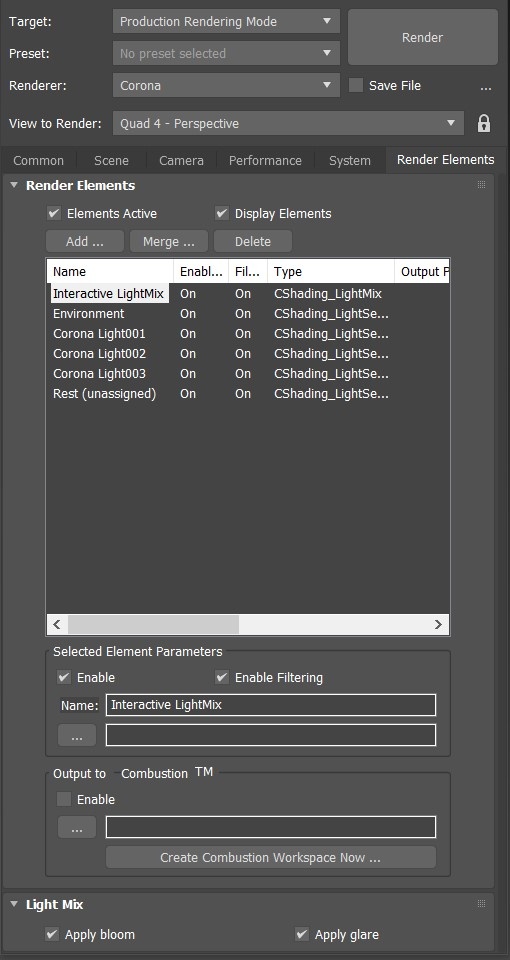
Go to Render Setup > Scene and under General Settings press the Setup Interactive LightMix button.

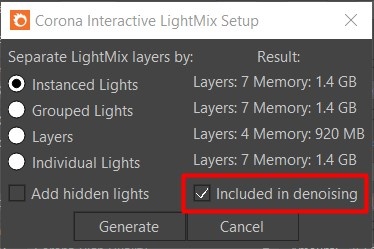
Corona Interactive LightMix Setup dialog will then pop up, allowing you to:
- Choose the way lights are grouped - based on instances, groups, or individual lights.
- See how much RAM is used by each LightMix layer (calculated depending on the resolution of the final render).
- Decide whether hidden lights should be also considered by the LightMix setup.
- Decide whether denoising should be applied to all LightMix and LightSelect render elements.
The available options for the automatic LightMix setup are:
- Instanced lights – If there are instanced lights in the scene, each group has its separate channel. All unique lights in the scene are stored in their individual render channels.
- Individual lights – Lighting information of each light is stored in a separate channel.
- Grouped lights – Lighting information of each group of lights is placed in a separate channel. All lights that are not attached to any group in the scene are stored in their individual render channels.
- Layers – Lighting information for each layer is stored in a separate channel.

Once the settings are confirmed with the Generate button:
- One CShading_LightMix element is automatically added to enable LightMix option in the VFB.
- One CShading_LightSelect element is added with the environment lighting included - this allows changing the color and intensity of the scene environment.
- Multiple CShading_LightSelect elements are automatically added - this allows changing the color and intensity of each scene light.
After using this one-click solution, you can start rendering the scene (both regular and interactive rendering will work), and then go to LightMix tab in the Corona VFB to change intensity and color of each light.

Set up LightMix manually
- Go to Render Setup > Render Elements, and then:
- Add at least one CShading_LightMix render element - this is required to enable the LightMix option in the VFB.
- Add at least one CShading_LightSelect render element - this is required to be able to control a scene light, or scene environment.
Each light that you wish to control should be added to Included light sources list in each CShading_LightSelect render element. You can add one or more lights to each LightSelect element. Additionally, you can enable the Include Environment Light checkbox to control environment lighting.
Objects that use CoronalightMtl with Emit light being disabled, cannot be added or selected for the CShading_Lightselect element. Equally, the same applies to objects with self-illuminated materials.

LightMix and Denoising
You can decide whether denoising should be applied to each LightSelect render element. To denoise the whole LightMix output, you must turn on the denoising option for all LightSelect elements.
Denoising can be enabled manually for each of the LightSelect elements.

Denoising can be also enabled automatically for all LightSelect elements using the included in denoising checkbox in the Corona Interactive LightMix Setup dialog.
Denoising can be enabled automatically for all of the LightSelect elements.
"Rest (unassigned)" LightMix item can be denoised and saved just like any other render element.
This is achieved by allowing any LightSelect render element to act as the Rest (unassigned) render element by enabling the appropriate option (Include lights not assigned to other LightSelect elements) for the LightSelect element.
Turning on Include lights not assigned to other LightSelect elements allows saving and denoising the LightMix pass with lights not included in other LightSelect render elements. This render element can and will be denoised just like other LightSelect render elements as long as the Apply denoising also to this render element option is enabled.
If any lights are left unassigned to any LightSelect render elements and no LightSelect render element has the Include lights not assigned to other LightSelect elements option enabled, these lights will still end up in the Rest (unassigned) section but you will not be able to denoise the render element or save it.

Usage Workflow
After setting up LightMix (either automatically, or manually), the color and intensity of each light can be changed in the VFB. Simply go to LightMix tab in Corona VFB and change the desired parameters - this can be done during, or after rendering, for both regular and interactive rendering. You can also use additional buttons below the lights list:
| Button | Description |
| Bake currently set Lightmix colors/intensities into the scene lights. |
| Save settings of the current displayed light mix element to a config file. |
| Load light mix settings from a config file to the currently displayed light mix element. |
| Enables all entries if some are disabled or disables all if all are currently enabled. |
| Set all intensities to 1. |
| Set all colors to white. |


Additional Tips:
LightMix colors can be copied by dragging and dropping a color swatch onto another swatch.
LightMix colors can be reset to pure white by right-clicking on a swatch.
You can also right-click on the light names on the LightMix list in the Corona VFB to select a specific light in the scene, add that light to the current selection, or remove that light from the current selection.

Compositing LightMix layers in other applications
To compose different LightMix layers (LightSelect render elements) so that the final image looks the same as in the Corona VFB open the layers in the application of your choice, and stack them on each other in any order using the add blending operation. In Adobe Photoshop it is called Linear Dodge (Add).
Using LightMix with multiple suns and environments
It is possible to add multiple suns and environment maps to your scene, and then control their appearance with LightMix. This means that you can render just once, and pick between completely different lighting conditions, adjust sun and environment intensity and color, and even have two or more suns illuminate your scene at a time. No re-rendering needed!
Check here: Using Multiple Corona Skies and Corona Suns in a Single Scene

Using multiple LightMix elements ( VFB 2.0)
Starting from Corona 12, with the new VFB 2.0, it is possible to create and manage multiple LightMix setups within a single render by manually adding multiple LightMix render elements.

