This page provides information on the Timeline Area in the Pdplayer User Interface.
Page Contents
Overview
The Timeline area holds the Layer Stack and Timeline area buttons along with the Timeline and Work Area. Here you can set the length of your composition, adjust the frame rate and arrange the different layers in the time line.
The upper most part of the Timeline Area is where the Playback Buttons, the View Buttons, and the Control Buttons are found. Each group gives you control over different aspects of Pdplayer.
In the middle of the Timeline Area is the Timeline itself followed by the Layer Stack.
Playback Buttons
Use these controls to play your composition both forward and backward, or if you want to closely inspect the imagery, go through it frame by frame. You can also change the frame rate at which the composition is being played.
1 – Moves the time slider to the composition’s next frame.
2 – Moves the time slider to the compositions’ previous frame.
3 – Plays the work area backwards.
4 – Plays the work area forwards.
5 – Moves the time slider to the first frame of the work area.
6 – Moves the time slider to the last frame of the work area.
7 – Toggles the repeat mode between once, loop, and ping-pong.
View Buttons
The channel view buttons control the channels which Pdplayer will show in the Preview Area. They are Red, Green, Blue, Alpha, Luma and Depth. You can view a particular channel by clicking it. This will make all buttons “dark” except for the one being shown. You can also right click any of the buttons and choose which channels to be displayed from a menu. The following pictures show the Channel View Buttons along with the effect each option has.
The Stereoscopic view button toggles between the different views in the Preview Area when working with a stereoscopic composition. You can also right click to select between the currently supported stereoscopic modes. For more information, see the Stereoscopy Support page.
Control Buttons
The control buttons controls what is seen in the Preview Area.
1 – Shows and hides the Property Panel
2 – Shows and hides the Safe area and Mask in the Preview Area. Right click to choose from the following set of predefined settings for the Mask and Safe area:
3 – Shows and hides the Workspace grid.
4 – Toggles between black and checkerboard background. Right click to choose from a list of different backgrounds as shown below. In addition to the default colors, you can choose a custom color or paste a color that you have copied. Finally, you can set any color as a Default color.
5 – Toggles the vertical synchronization on and off for the screen. This prevents tearing, but may have a performance cost. Right click on the button to bring out additional options for the screen synchronization.
6 – Toggles the cache resolution between Full Resolution, Half Resolution, and Quarter Resolution. This is useful to speed up the working process when you are short of RAM.
7 – Toggles the HTTP Server on and off. Right clicking allows you to Copy the server address or Open the server in a browser.
8 – Enables or disables the output device. Right click to choose from a list of available devices.
Note that the resolution of the output signal will be the same as the resolution of the Mask. In cases where the output device does not support the Mask resolution, it will not work.
Layer Stack
One of the great features of Pdplayer is its ability to play different sequences or clips simultaneously. This is achieved by adding each sequence or movie as a layer. The image below shows the Layer Stack. It has several elements incorporated in it that allow us to work with the different layers and the Timeline.
Timeline
The upper most part of the Layer Stack is the Timeline. It displays information about the parameters at which the composition is being played and allows us to change them. On the right hand side of the Timeline is a number specifying the Timeline length in frames. It can be changed by double clicking and entering a different number. It can also be set to fit the length of all layers or the length of the Work Area by right clicking and choosing a command from the context menu:
Resize Timeline to Fit All Layers – Changes the Timeline length to fit the length of all current layers.
Trim Timeline to Work Area – Changes the Timeline length to the current Work area.
Work area
The Work area is actually the part of the time line that is being played. It is represented by a blue bar inside the Timeline. You can change the length of the Work area by going to the left or right side of it with the mouse and click and drag to scale it. You can also move it within the Timeline by dragging it with the middle mouse button.
Playback framerate
On the left hand side of Timeline is the Playback Frame rate parameter, which specifies the rate at which the movie or sequence is played in frames per second. You can change this either by clicking and dragging with the left mouse button, or by double clicking it and entering a number. You can also right click on the number to select from list of predefined frame rates (shown here):
Layers
Below the Timeline are all the layers, each represented by a bar with a name.
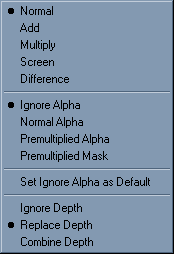
On the left hand side of the layers there are four indicators: The first one is the number of the layer, while the next icon is the transparency of the layer. You can show or hide the layer by clicking on this icon or change the transparency using the mouse wheel over it. The third icon is available when the layer contains audio. It allows you to control the volume of the audio for the specific layer. The last icon controls the layer blending. Right click on it to change the blending and alpha mode of this layer.
Blending modes context menu
The first part of the menu allows you to choose between the five basic blending modes for the layer. You can also choose the alpha mode for the layer and the way Pdplayer uses the information in the depth channel. The different Alpha and Blending modes are explained in the Blending Panel page.
Right clicking a layer in the timeline will bring up an additional layer context menu. For more information on the context menu, see the Layers page.
Layer context menu


