This page contains chapter 3 of the Houdini to 3ds Max Alembic Workflow tutorial, covering the export of Hair or Splines.
Overview
There are two issues that you may stumble upon when exporting curves from Houdini:
- The point @width attribute is not present on your geometry – as discussed earlier in Chapter 02: Particles, V-Ray looks at the @width attribute to determine the diameter of the strands.
- The @width attribute is changing dramatically from one point to the next (i.e., first point width equal to 0.1 and last point width equal to 50) – in a case like this, you may notice the tubes looking rather like a bunch of spheres stacked one after the other. There aren't many approaches to this case, beside increasing the point count on the curves to soften the transition or decreasing the min/max range for the width.
You can download the project's files from here:
Download Project Files (260MBs)
The workflow for exporting splines/poly lines is exactly the same as with particles.
The @width attribute controls the size of the tube generated by V-Ray at render time. Per-point width is also supported by V-Ray – you may map the width along the length of each strand and the changes carry over.
Color and all custom attributes can be accessed through a Vertex Color texture and have to be of class 3flt (Vec) or 3flt (Clr).
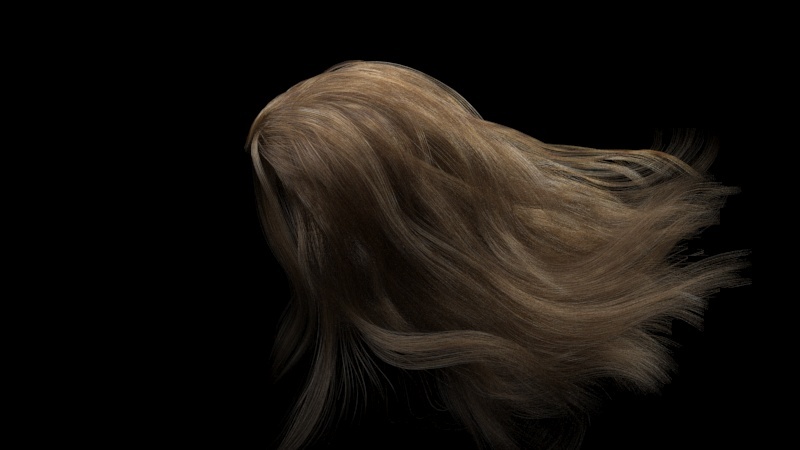
Hair rendered with V-Ray Hair Next material → Melanin parameter is randomized with Vertex Color texture reading a custom @my_melanin_attr created in Houdini per-guide
A standard Houdini hair generation setup is used here. As with the previous chapters – the Houdini setup will not be discussed in depth.
Note that in the External_Guides node an Attrib Wrangle node is created with the following VEX expression: f@my_melanin_attr = fit01(rand(@class), 0.15, 0.7);
This is used to create a custom Point @my_melanin_attr on the Guide curves which is later transferred to the generated hair and used in 3ds Max through a Vertex Color texture to drive the Melanin parameter of the V-Ray Hair Next material.
You can open the provided Chapter_03_Splines.hip file to see the entire setup.

The exported hair is loaded through a V-Ray Proxy and a V-Ray Hair Next Material is assigned to it.
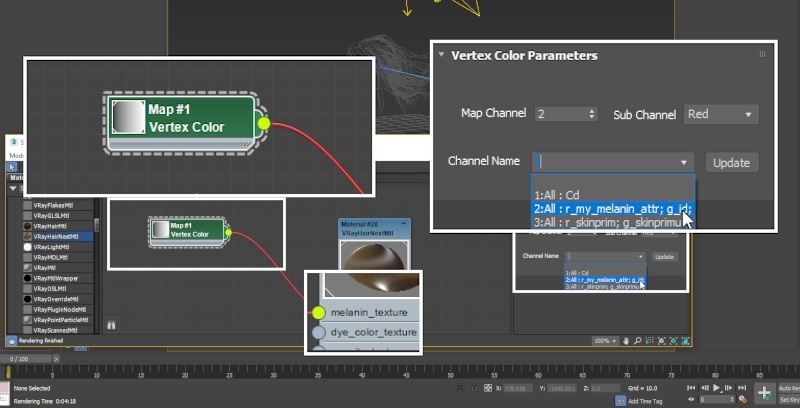
A Vertex Color 1 texture is piped into the melanin_texture parameter of the Hair material.
You need to press the Update button after applying the material and assigning the texture for the custom attributes stored in the Alembic file to show up.
Opening the Channel Name drop-down lists all attributes stored in the Alembic file. In this case, my_melanin_attr is a float so we need to specify the Sub Channel parameter as well. In this case it's Red but that may differ in your scene so make sure to take note of the prefix r_ , g_ and b_ which specify what Sub-Channel should be set for the chosen attribute (ie. Red for r_, Green for g_ and Blue for b_).
You can now press Render and everything should work right out of the box.
The Alembic file can store per-frame attributes. This allows you to drive any exposed parameter on any V-Ray node with a per-frame @custom_attribute.
You could, for instance, whiten the hair of a character over a set range of frames by stating f@my_melanin_attr = fit(@Frame, 0, 20, 0.7, 0); in an Attribute Wrangle node.
The video to the right shows the result of f@ml = fit01( rand( f@my_class + @Frame), 0.1, 0.8); where @my_class is produced with a Connectivity SOP on the Guides and transferred to the generated hair.
This is essentially producing a random @ml value for each guide curve. This is then mapped to the melanin_texture parameter on the V-Ray Hair Next material.
Footnotes
1 – The use of Vertex Color texture can be changed with either VRayUserColor or VRayUserScalar textures when reading color sets and attributes of an alembic.