This page gives provides examples on using the Sampler Info node with extra V-Ray Attributes.
Overview
The Sampler Info node is a Maya utility node that provides various scene information. V-Ray Extra Attributes can be applied to the node to increase the node's output options. For more information, see the Additional Outputs section of the Texture Attributes page.
The Sampler Info node is a color image that provides information about the scene, with the choice to show any of various aspects as color blocks. This provides information about various aspects of the shaded points such as position, normal, bump normal, reflection/refraction vectors and UVW coordinates. It can be used either for world position passes or normal passes. It also extracts information about the scene, converting the gathered information into RGB data for use in compositing.
UI Path: ||Select Sampler Info node|| > Attribute Editor > Attributes menu > VRay > Additional outputs

Additional Outputs
Normal Obj – Specifies the smooth normal in object space.
Normal World – Specifies the smooth normal in world space.
Geom Normal World – Specifies the geometric normal in world space.
Point World Reference – Specifies the shading point in reference space.
Normal World Reference – Specifies the bump normal in relative space.
Bump Normal World – Specifies the bump normal in world space.
Bump Normal Camera – Specifies the bump normal in camera space.
Bump Normal Object – Specifies the bump normal in object space.
Ray Depth – Specifies the ray length.
Path Length – Specifies the path length.
Surface Material ID – Specifies the material ID if the surface supports it.
Object ID – Specifies the object ID of the hit object.
Parent Object ID – Specifies the object ID of the parent object.
Velocity World – Specifies the velocity at the intersection point in scene units per frame (in world space).
Speed – Specifies the speed at the intersection point in scene units per frame.
Random by ID – Assigns a random color/texture by each object's ID.
Random by Polly Shell – Assigns a random color/texture based on the polygon shell the current face belongs to.
Random by scene name – Assigns a random color/texture by each object's full scene path.
Frame Index Offset – Outputs an offset from the current frame for motion blur intervals longer than one frame. For example, if you have a Motion Blur interval spanning three frames, the output will return -1, 0, or 1 depending on the ray time. See the example below where the Frame Index Offset option is used to mix textures from a sequence to produce a motion blur effect. This option is not supported with V-Ray GPU.
Transparency Level – Outputs how many transparency intersections have occurred at the point of intersecting the first surface along the ray path. See the use case below for more information.

Common Uses
The SamplerInfo node extracts particular information about the scene. It then converts the gathered information into RGB data. It can be used within the Maya Hypershade or to drive a material channel to achieve various effects. This can provide more render passes with information that can allow more possibilities to editing during the compositing process.
Example: UV Coordinate Render Element
By plugging in the SamplerInfo node to the Extra Texture Render Element, several additional render passes can be created.
To create a pass that represents UV coordinate information as red, green or blue colors, create a SamplerInfo node and use the Maya Connection Editor to connect the U Coord and V Coord outputs to different Vray Texture Extratex inputs for R, G, or B. In the example shown below, the U Coord output is connected to Vray Texture Extratex R and the V Coord output is connected to Vray Texture Extratex G. This causes the U coordinate information to appear as red in the render pass, while the V coordinate information appears as green.

HyperShade node graph with connection to create UV Coordinate pass

UV Coordinate render from ExtraTex pass
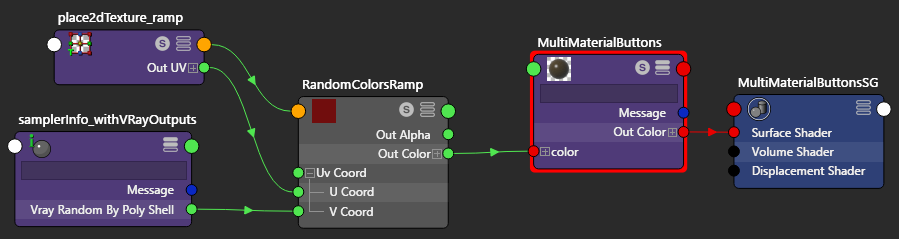
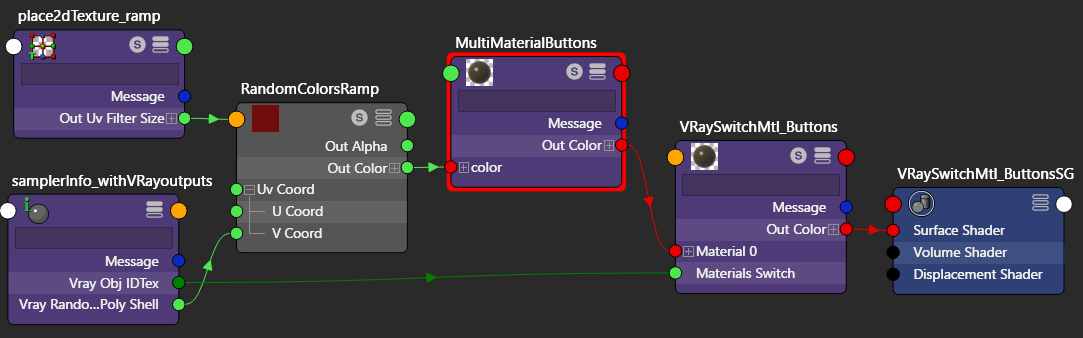
Example: Random Colors by Object ID
Using the SamplerInfo node with the V-Ray Additional outputs in Maya Hypershade, it is possible to apply a random color (or texture) over several objects based on each object's Object ID. To do this, connect the Vray Random By ID output to a ramp texture, and connect the ramp texture to any texture channel in a material. This applies a different color (or texture connected to a color slot in the ramp texture) for each ID on objects within a scene.
In the example rendering below, the switches, sliders, and buttons that appear in the bottom part of the image have been assigned various Object IDs, and objects with the same Object ID receive the same color.


Vray Random By ID controlling the V Coord parameter of a V Ramp with Interpolation set to Linear.
Colors of the switches are various colors between the different colors in the gradient.

Vray Random By ID controlling the V Coord parameter of a V Ramp with Interpolation set to None.
Colors of the switches are limited to the specific colors set in the gradient.

The V coordinates of a V Ramp with Interpolation set to Linear.

The V coordinates of a V Ramp with Interpolation set to None.
Example: Random Colors by Poly Shell
The SamplerInfo node, with the V-Ray Additional outputs in the Maya Hypershade, makes it possible to apply a random color (or texture) to multiple objects that have been combined into a single object. This is done by connecting the Vray Random By Poly Shell output to a ramp texture which is then connected to any texture channel in a material. This applies a different color (or texture connected to a color slot in the ramp texture) to each poly shell within a scene.
In the example rendering below, the switches, sliders, and buttons in the bottom part of the image have been combined into a single object. As such, Vray Random By Poly Shell will apply a different color randomly to each poly shell within the object.

Vray Random By Poly Shell controlling the V coordinates of a V Ramp with Linear interpolation.
The V coordinates of a V Ramp with Interpolation set to Linear.
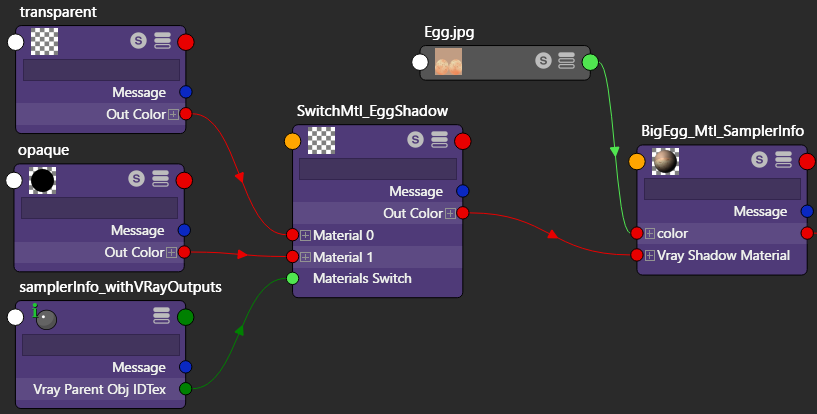
Example: Control Shadows with Switch Material and Object IDs
The Maya SamplerInfo node, with the V-Ray Additional outputs in the Hypershade, makes it possible to control which geometry casts shadows on other geometry within a scene. With this method, you control the casting and receiving of shadows via the VRaySwitchMtl material and Object IDs for the various objects.
For the object that is casting shadows on other objects:
- Assign the shadow-casting object an Object ID of 0.
- In the material for this object, add Material Attributes and choose V-Ray Material Override as the type. This makes the Shadow Material slot available for the material.
- Create a VRaySwitchMtl material, and connect the Materials Switch attribute to the Vray Parent Obj IDTex output of a SamplerInfo node.
- Place this VRaySwitchMtl within the Shadow Material slot.
For objects that could potentially receive shadows from the shadow-casting object in the scene, assign an Object ID of 1 to geometry objects that you want to receive shadows, and an Object ID of 0 to geometry objects that you do not want to receive shadows. No special material is required for these objects.
In the example below, the V-Ray Switch material set up for shadow control is assigned to the topmost egg. By setting different Object IDs for other objects in the scene, shadows cast by the topmost egg can be limited to certain objects.
For more details, see the Controlling Shadows Using the Sampler Info Node page for a step-by-step tutorial.
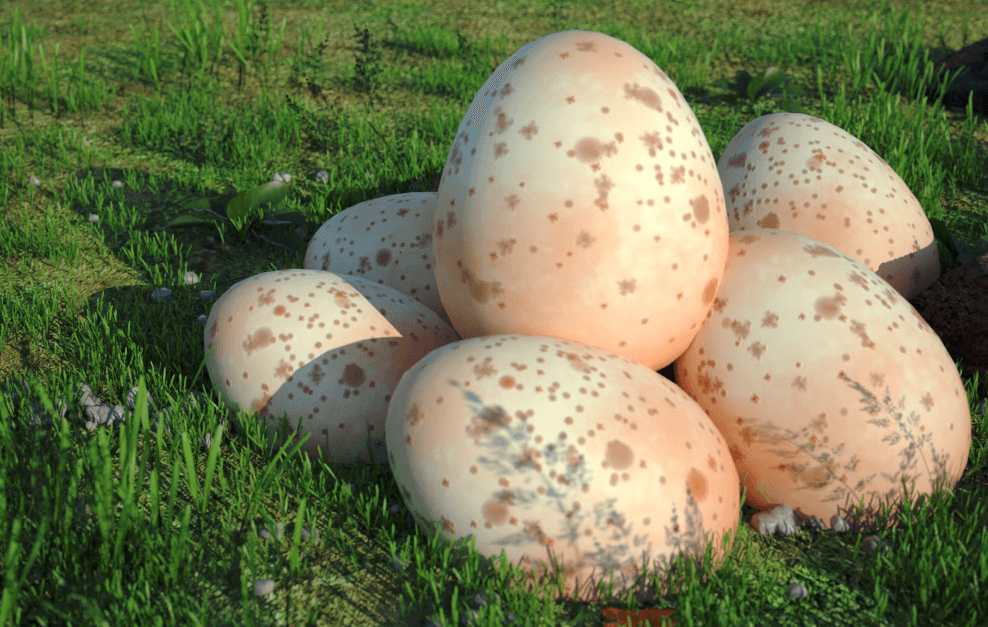
No Switch Material used.
Topmost egg casts shadows on other eggs and grass.
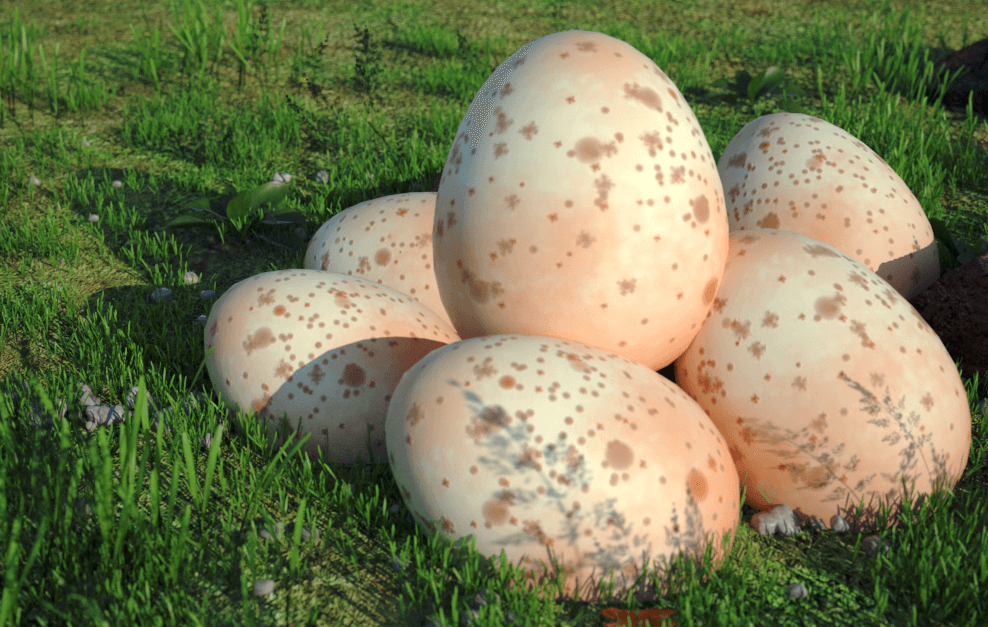
Eggs in grass have Object ID of 0, grass has Object ID of 1.
Topmost egg casts shadows on the grass but not on the other eggs.
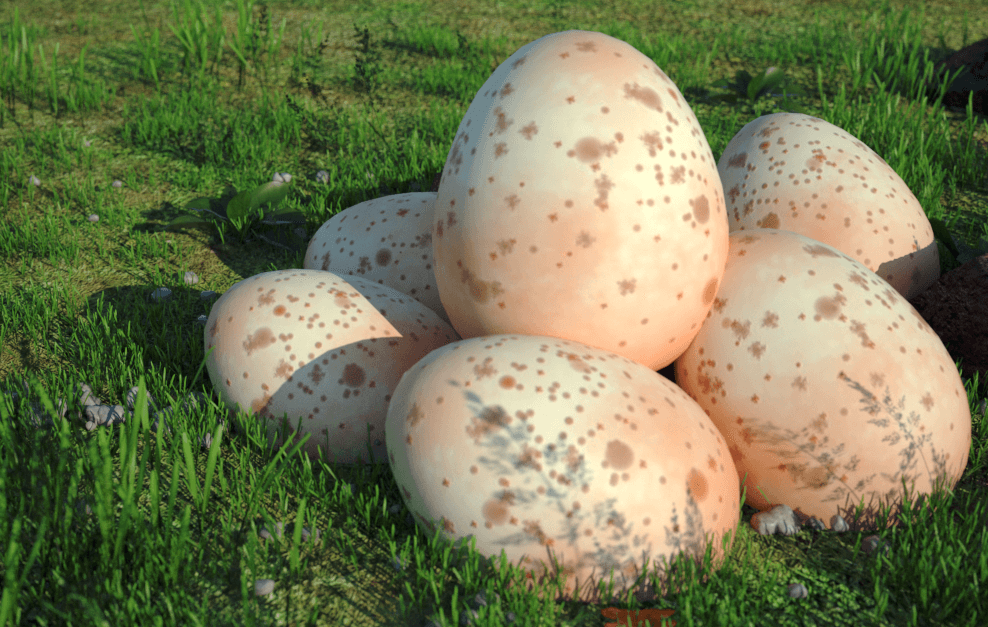
Eggs in grass have Object ID of 1, grass has Object ID of 0.
Topmost egg casts shadows on other eggs but not on the grass.
Example: Random Colors with Switch Material
The SamplerInfo node with the V-Ray Additional outputs, in Maya Hypershade, makes it possible to apply a random color (or texture) by connecting the Vray Obj IDTex output to the Material Switch channel on a VRaySwitchMtl.

Vray Obj ID Tex controlling the V coordinates of a V Ramp with Linear interpolation.
Notice how the colors produced can be anywhere between the different colors in the gradient.

Vray Obj ID Tex controlling the V coordinates of a V Ramp with Interpolation set to None.
Notice how the colors produced are only the colors set in the gradient.
The V coordinates of a V Ramp with Linear interpolation.
The V coordinates of a V Ramp with Interpolation set to None.
Example: Frame Index Offset
With Maya SamplerInfo's extra attribute Frame Index Offset you can simulate a motion blur effect on a sequence of textures. In this example, we have a sphere object that changes its position with with each frame. The Camera Motion Blur options are enabled with Duration set to 2 frames. The object is initially assigned a material with an Image sequence file connected to its Color. This results in motion blurred geometry that only uses a single texture per frame.
To achieve the mixing between the textures, a VRayMultiSubTex with three sub-textures starting from 0 is created and linked to the Color input instead. The three textures are connected to three file nodes within the same sequence, but a different Frame Offset: -1 for previous, 0 for current and 1 for next.
The VRayMultiSubTex Get ID from is set to Texture Switch and a floatMath node is connected to control the Switch texture. This is done because VRayMultiSubTex cannot have negative values for input.
The SamplerInfo's extra attribute Frame Index Offset is plugged in Float A. Float B is set to 1 with an Add operation between the two. Now the 0 texture is used for the -1 or previous frame, 1 for the current or 0 frame and 2 for the +1 or next frame.


Duration (frames) is set to 2 - the effect interpolates between the three frames using the three textures.
Example: Translucency Level
The Translucency level output in the Additional Outputs of the samplerInfo node indicates the number of transparency intersections at a shaded point. In this example, we set up a VRaySwitchMtl with two semi-transparent materials: a reflective material at input 0 and a diffuse material at input 1. We use a floatLogic node to check the Transparency Level output and to return 0 (or false) when there are no more than 1 transparency intersections or 1 (true) when there are more than 1 intersections. The floatLogic then drives the VRaySwitchMtl so that the reflective material is assigned when we shade the first transparent object, but the diffuse material is used for the rest of the objects only when they are seen through the first transparent object. Download the scene to take a closer look at the setup.
![]()
![]()