This page provides information on the Materials tab in the V-Ray Appearance Manager.
Overview
The Materials tab allows you to replace the standard Revit materials with more powerful and versatile V-Ray materials, including .vrscan files. This includes the ability to properly scale and rotate V-Ray materials and a quick link to the V-Ray Asset Editor to edit them.
In order to replace a Revit material with a V-Ray one, you first need to create V-Ray materials in the Asset Editor. Those will then become available in the drop-downs next to each material in the Appearance Manager.
If you don't associate a Revit material with a V-Ray one, the Revit material will be automatically converted to a V-Ray material during V-Ray rendering. It will use the material properties specified in the Revit Material Browser.
With V-Ray 5, update 1, you can also promote the new Revit Prism-based materials as V-Ray ones to the Asset Editor. This equips the native Revit materials with parameters specific for V-Ray Materials only, thus further expanding the possibilities for modifying them.
With V-Ray 6, Enscape materials properties are considered when promoting materials to the Asset Editor.

UI Path
||Appearance Manager|| > Materials tab
Search Bar and Filters
This allows you to search for materials. Note that if a Revit Identity Class name is inputted in the search bar, only the materials belonging to that class are displayed in the list below.
You can also choose from the following options in the Filter drop-down menu:
Show Materials
All – Lists all materials in your project.
Used in project – Lists all materials in your main Revit file, i.e. hides all linked files materials.
Latest Render – Lists all materials that were exported by V-Ray during the latest render you have done.
Prism only – Lists all Prism-based materials, i.e. all materials that can be promoted using the Promote Revit materials as V-Ray ones functionality.
V-Ray Mapping
All – Lists all materials, i.e. the V-Ray Mapping filter is not applied.
Mapped – Lists all materials that have been replaced with a a V-Ray Material.
Unmapped – Lists all materials that have not been replaced with a V-Ray Material yet.
Transparency
All – Lists all materials, i.e. the Transparency filter is not applied.
Opaque – Lists only the opaque materials in the project.
Transparent – Lists only the transparent materials in the project.
Opaque and Transparent filters can be used as an alternative to the Global Overrides options, with the ability to exclude specific materials from the override.
V-Ray Grass/Fur
All – Lists all materials, i.e. the V-Ray Grass/Fur filter is not applied.
Mapped – Lists all materials that have been assigned a V-Ray Grass/Fur.
Unmapped – Lists all materials that have not been assigned a V-Ray Grass/Fur.
Fur assigned to a material can be disabled from the Fur (![]() ) icon in the Appearance Manager when the material is selected.
) icon in the Appearance Manager when the material is selected.
A grey dot next to a material indicates that Fur is assigned to that material.
V-Ray Displacement
All – Lists all materials, i.e. the V-Ray Displacement filter is not applied.
Mapped – Lists all materials that have been assigned a V-Ray Displacement.
Unmapped – Lists all materials that have not been assigned a V-Ray Displacement.
Displacement assigned to a material can be disabled from the Displacement (![]() ) icon in the Appearance Manager when the material is selected.
) icon in the Appearance Manager when the material is selected.
A grey dot next to a material indicates that Displacement is assigned to that material.
Right-click on the filter icon, resets the filters to their defaults.
When you click on the Pick Material button (![]() ), and select a surface in the Revit model, you can see only its material displayed in the material list.
), and select a surface in the Revit model, you can see only its material displayed in the material list.
Note that the option works only on surfaces that are native for the Revit model and does not work for linked models.

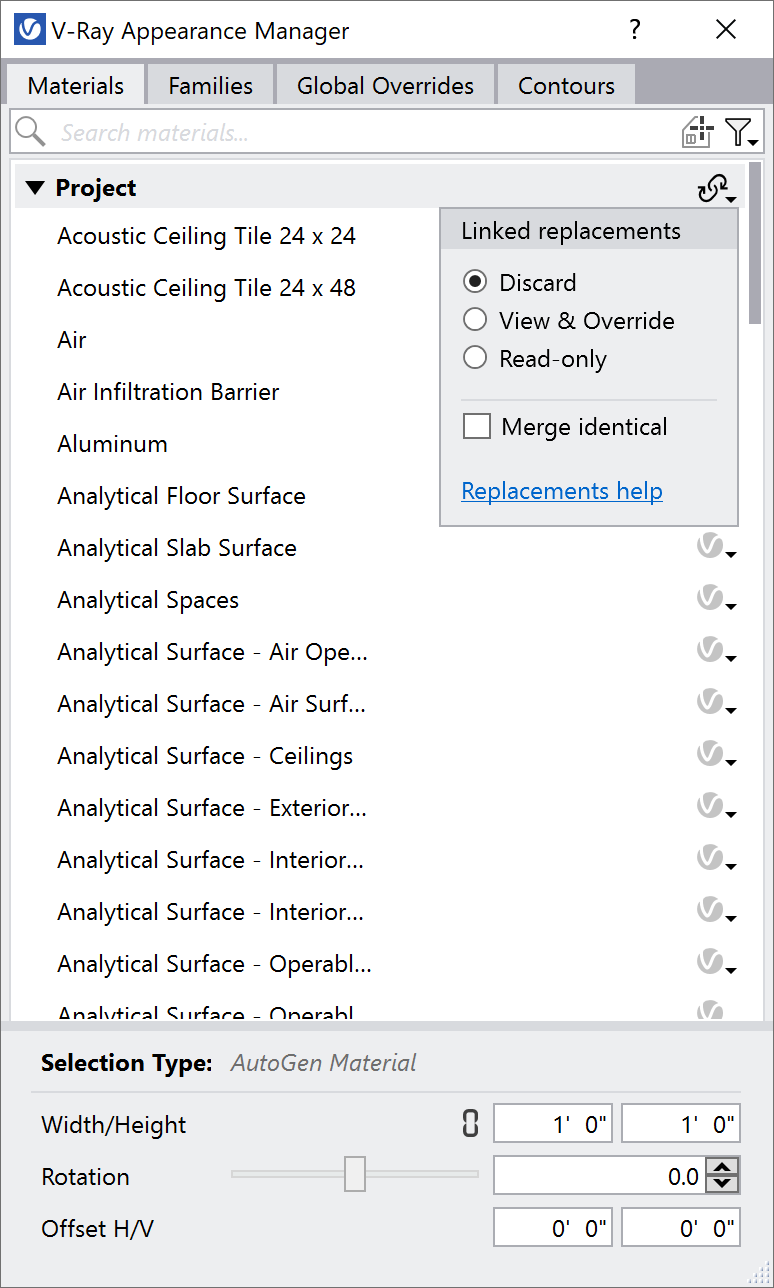
Material Transform
These settings allow you to control the scale, rotation and offset of all maps that a V-Ray material comprises. Use them after you replace a Revit material with a V-Ray one to match the V-Ray material's map size with your project scale.
Width/Height – Set the width and the height of the V-Ray material.
Rotation – Rotates the V-Ray material (in degrees).
Offset V/H – Controls the V-Ray material offset in the vertical (V) and horizontal (H) direction.
![]()
Linked Replacements
The Linked replacements ![]() settings allow you to specify whether V-Ray material replacements coming from linked files are treated with respect to the host file or to the linked file:
settings allow you to specify whether V-Ray material replacements coming from linked files are treated with respect to the host file or to the linked file:
Discard – All linked V-Ray replacements are discarded. This allows for overriding the materials/families in the linked file.
View & Override – Linked V-Ray replacements can be viewed, rendered or overridden with V-Ray assets created in the host project.
Read-only – Linked V-Ray replacements are rendered but are hidden from the list. An override is not allowed. This mode can be used for reducing the list in the Appearance Manager.
Merge identical – When enabled, identically named items are hidden from the linked file list(s) and remain listed only in the main project section. Their replacements are based on those of the host project. For example, if Bricks_01 material is present in both the host and linked projects and Merge identical mode is enabled, Bricks_01 will only be visible in the Project group of materials. But when replaced with a V-Ray material, it will also override the Bricks_01 material of the linked project.
Replacing Revit material with a V-Ray material
Each Revit material can be replaced with a V-Ray material from the drop-down menu of the Revit material in the Appearance Manager. Both left- and right-click open the menu. Note that the V-Ray material has to be created in the Asset Editor first.
When a Revit material is replaced, the V-Ray logo in the Appearance Manager becomes darker. In case a V-Ray material is removed from a Revit material, left-click on the logo, restores the last V-Ray material that was assigned to the Revit Material.
Promote Revit materials as V-Ray ones in Asset Editor
Revit native Generic and Prism materials (Opaque, Transparent, Glazing, Metal and Layered) can be promoted and treated as V-Ray materials in the V-Ray Asset Editor via the Promote in Asset Editor (![]() ) button. Clicking that button transfers the selected native material to the V-Ray Asset Editor where it can be further enhanced with V-Ray material parameters and saved as .vrmat for reuse.
) button. Clicking that button transfers the selected native material to the V-Ray Asset Editor where it can be further enhanced with V-Ray material parameters and saved as .vrmat for reuse.
One native material can be promoted multiple times, and each time a new V-Ray Material is created in the Asset Editor.
If Render Enscape Materials option has been enabled in the Global Overrides tab, the Enscape material properties are considered when promoting the material.
Pressing Ctr+Click on the Promote in Asset Editor button automatically assigns the converted V-Ray Material as a replacement to the source native material.
