Versions Compared

Key

  • This line was added.
  • This line was removed.
  • Formatting was changed.

This page provides information on the BRDFLight material node.


Overview

...

The BRDFLight material is a special material provided with the V-Ray renderer. This material is generally used for producing self-illuminated surfaces. This material's light emission can be used as indirect as well as direct illumination in the scene.

This allows for light sources of any shape, and may even be assigned at the object level and at the face level for self-illuminating only portions of a mesh.


UI Paths

...

Section
Column
width33%

 ||mat Network|| > V-Ray > Material > V-Ray Light


Column
width33%

||out Network|| > V-Ray Render Elements node > V-Ray > Material > V-Ray Light


Column
width33%


Node

...

Section
Column
width50%

The BRDFLight node provides inputs for controlling various material properties. Most correspond to parameters in the section below.

Column
width5%


Column
width45%

Image Modified


Parameters


...

Section
Column
width50%

Light Color

...

 – Controls the color of the light material.

Color Multiplier – A multiplier for

...

the Light Color.

...

 For more information, see

...

the Default Color and Multiplier Values example and

...

the Textures

...

example below. 

...

Transparency – A texture to use as transparency for the material. Note that making the material more transparent does not affect the intensity of the self-illumination color. This is so that you can create perfectly transparent materials that still emit light.

Double Sided – When enabled, the material is double-sided.

Emit On Back Side – When enabled, makes the object emit light from its back side as well. If this is off, the material is rendered as black on the back sides. For more information, see the Emit On Back Side example

...

 below

Compensate Exposure

...

 –Used when rendering with

...

the V-Ray Physical Camera. When enabled, the intensity of the material is adjusted to compensate for the camera exposure.

Multiply By Opacity

...

 – When enabled, the color of the light material is multiplied by

...

the Transparency

...

 texture. Otherwise, the color and transparency act independently (so-called additive transparency).

Column
width5%


Column
width45%

Image Added


Anchor
defaultColorAndMultiplier

...


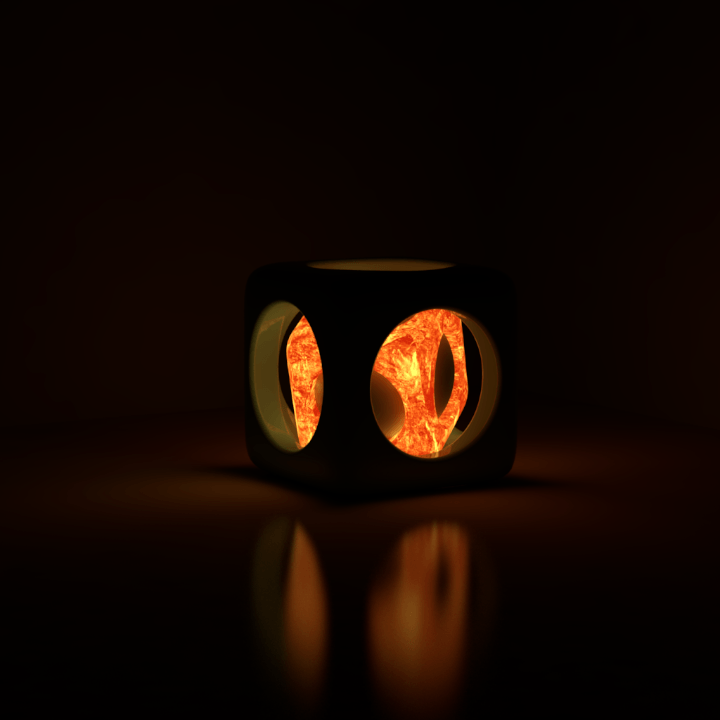
Example: Default Color and Multiplier Values


For the examples below, the interior cube is the default BRDFLight material. The exterior cube and ground plane have the default VRayMtl with Reflection. The rest of the scene is shaded with a basic diffuse VRayMtl.

This scene is rendered without any direct light sources.


Section
Column
width5%25%


columnwidth30%columnwidthcolumn
Column
width30%50%
Image slider
Panel
borderStylenone

Image Added

Image Removed

Color Multiplier: 1.0
Compensate Camera Exposure: off
GI: off

The image is dark except the inner cube (self-illuminated) and faint reflection on the ground. Notice there is no GI and no lights at all, so the darkness of the scene is expected.

 
Panel
borderStyle
none

Image Added

Image Removed

Color Multiplier: 1.0
Compensate Camera Exposure: on
GI: off

Notice the inner cube and reflections appear brighter due to the exposure compensation. The rest of the image is still black because GI is disabled.


Panel
borderStyle
Image Removed
none
30%

Image Added

Color Multiplier: 1.0
Compensate Camera Exposure: off
GI: on

With GI enabled, the outer cube and inner sphere become slightly visible. However, the image remains very dark.


Panel
Column
width5%


Column
width30%
Image Removed
borderStyle
width5%


Section
columnwidthcolumnwidth
none

Image Added

Color Multiplier: 50.0
Compensate Camera Exposure: off
GI: off

The inner cube and reflections are noticeably brighter. With GI disabled, the image remains in darkness.


Panel
borderStyle
Image Removed
none
30%

Image Added

Color Multiplier: 50.0
Compensate Camera Exposure: on
GI: off

By enabling Compensate Camera Exposure, the reflections become brighter with the current Color Multiplier value.


Panel
borderStyle
Image Removed
none
30%

Image Added

Color Multiplier: 50.0
Compensate Camera Exposure: off
GI: on

With GI enabled, the scene receives more illumination with the current Color Multiplier value.

 Move the slider to see the example renders.

Column
width5%25%


Anchor
textures
textures

...


Example: Textures


This example shows using the BRDFLight material with a texture in the Color the Color slot. In order to control the strength of the light we need to adjust the value of value of the Color Multiplier.

For the following examples, Emit on Back Side and GI are enabled.


Section
Column
width25%


columnwidthcolumnwidthcolumn25%
Column
width50%
Image slider
Panel
borderStylenone

Image Modified

Color Multiplier: 3.0

A texture is connected to the Color slot. The Color Multiplier is quite low, so only the plane and the reflection on the cube are visible.


Panel
borderStyle
none
25%

Image Modified

Color Multiplier: 30.0

 Increasing

Increasing the Color Multiplier leads to a much brighter look in the scene. Notice that now the texture approaches a white color due to multiplying the (R,G,B) values of the texture.

 
Panel
borderStyle
none
25%

Image Modified

Color Multiplier:

 3

 3.0

Here, another texture is connected to the Color slot. Notice the VRayMtls for the surrounding walls is unchanged, but the scene looks different due to the new texture.

 
Panel
borderStyle
width
none

Image Modified

Color Multiplier: 30.0

Increasing the Color Multiplier leads to a much lighter look to the scene. Notice now that the texture approaches a white color due to multiplying the (R,G,B) values of the texture.

Move the slider to see the example renders.

Column
width25%


Anchor
EmitOnBack
EmitOnBack

...


Example: Emit On Back Side


In the examples below, the BRDFLight material is applied to the curved plane.


Section
Column
width25%


columnwidthcolumnwidthcolumn25%
Column
width50%
Image slider
Panel
borderStylenone

Image Modified

Color Multiplier: 1.0
GI: on
Emit on Back Side: off

Increasing the multiplier visibly influences the scene. Shadows appear.


Panel
borderStyle
none
25%

Image Modified

Color Multiplier: 1.0
GI: on
Emit on Back Side: on

The scene starts to gather more light with Emit on Back Side enabled.


Panel
borderStyle
none
25%

Image Modified

Color Multiplier: 15.0
GI: on
Emit on Back Side: off

The back is still dark, but notice the blue wall receives some GI due to higher Color Multiplier value. Shadows appear more defined.

 
Panel
borderStyle
width
none

Image Modified

Color Multiplier:

 15

 15.0
GI: on
Emit on Back Side: on

The scene gathers more light with Emit on Back Side enabled. Be aware of resulting burnt areas when using the Linear type of Color mapping.


Move the slider to see the example renders.

Column
width25%


...


Anchor
Notes
Notes

Notes

...

Fancy Bullets
typecircle
  • You can use the BRDFLight material as a light source assigned to an object. Increasing the Value of the color affects the GI solution and produces more light. Note that overbright colors may look the same as pure white but the GI results are different.
  • If you know the photometric power of a self-illuminated object in lumens (e.g. 1700 lm for a 100-watt bulb) you can calculate the multiplier for BRDFLight material if you divide the lumens by the surface area of the object in meters, provided that the self-illuminated color is pure white.
  • The direct illumination options currently only work properly if the BRDFLight material material is the only material applied on the object. They do not work if the material is part of a complex material like a BRDFLayeredMtl material. This restriction will probably be removed in a future release.