This page provides information on the Simulation rollout for a LiquidSim object.
Overview
The Simulation rollout contains the main panel for controlling the simulation process. It also displays statistical information like simulation times, and the content of the cache file for the current frame. The content can be grid channels such as Liquid, Velocity, etc., as well as particle groups. You can select which channels to export to the cache files from the Output rollout, while particle groups are created by the Splash and Foam rollouts.
Many simulations require a long time to calculate and it's very convenient to let them run during the night. However, you still have to render the result in the morning, and this also consumes a lot of time. In this case, the Phoenix Scripting system can be helpful, since it enables you to execute any action at the end of the simulation, including rendering. You simply need to enable "Use Script" from the Simulation rollout, and open the script text. For more information, see the Nightly Simulation and Rendering section on the Tips and Tricks page.
UI Path: ||Select Liquid Simulator object|| > Modify panel > Simulation rollout
Actions
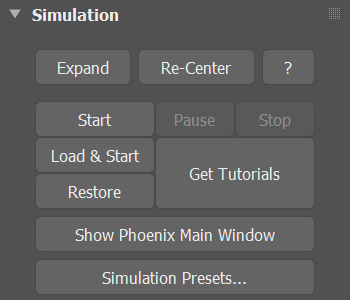
Expand – Opens a floating dialog that contains the selected rollout and automatically folds the command panel rollout.
Re-Center – Resets the position of the floating rollout.
? – Opens up the help documents for the Liquid Simulation options.
Start, Pause, Stop, Resume | A_StartSim, A_StopSim – Start, pause, and stop the simulation. Once the simulation has been paused, the option to Resume becomes available. Note that you can stop a running simulation using the Shift+Escape key combination, or with the Escape key, if the option to do so is enabled in the Phoenix FD Global Preferences.
Load & Start | A_StartSim – Loads the data from a single cache as an initial state for the simulation and starts simulating from the Start Frame the same way the Start action works. The cache can be of the .aur, .vdb, or .f3d formats and so can be imported from a 3rd party software into Phoenix. The loaded grid will be resized to fit the grid's dimensions at the Start Frame. The loaded cache does not need to be a Backup frame or to contain velocity at all - the simulator will load any available channels from the cache file and the rest of the simulated channels will be empty as when starting a brand new simulation. If you wish to smoothly continue a simulated sequence from a given frame, please use the Restore command instead.
Restore | A_StartSim – Continues a simulation from the currently viewed frame on the timeline, or the latest Backup frame containing the full simulation state up to the current timeline frame, which is controlled by the Backup Interval parameter in the Output rollout. This way, a Phoenix simulation that has been stopped previously can be resumed from the point you left off, even after the software has been closed and reopened.
The ability to restore a sim is only possible when the full internal state of a Phoenix simulation has been exported. This is controlled by the Backup Interval parameter in the Output rollout, which determines how often the full simulation state is backed up. Frames with the full state are called Backup frames.
When a Backup frame is currently viewed, the text "Can Restore From Here" appears in the Cache File Content list. The Restore command finds the latest Backup frame up to the current timeline frame, and continues the simulation from there. Note that restoring does not work for cache sequences imported from 3rd party software.
Get Tutorials – Opens the Tutorials and Examples page in the web browser.
Phoenix Help – Opens up the help documents for the Liquid Simulation.
Show Phoenix Main Window - Opens a floating dialog where floating rollouts of Simulators can be docked. The layout of this window gets saved to the .MAX scene files.
Simulation Presets... | A_LoadRenderPreset – Displays a dropdown menu to either load or save .tpr or .slog files, which hold settings for this simulation.
Parameters
Start Frame | startframe – Explicitly sets the Start frame of the Simulation. This can also be a negative number. Only available when Timeline (Start Frame) is disabled.
Timeline | start_from_timeline - When enabled, the Simulation will run from the Timeline Start Frame.
Stop Frame | stopframe – Explicitly sets the End frame of the Simulation. This can also be a negative number. Only available when Timeline (Stop Frame) is disabled.
Timeline | stop_from_timeline - When enabled, the Simulation will run to the end of the Timeline.
Render On Each Sim Frame | rend_sim_frame – During simulation, after each new frame is simulated, this option will start a render with your currently assigned production renderer and with the render settings you have dialed in your Render Setup 3ds Max dialog. You need to have set a Render Output File in the 3ds Max Render Settings in advance. Phoenix will automatically append the frame number to the file name. You can use Render On Each Sim Frame when you leave a long simulation overnight, so you will have a ready rendered sequence when you come back to check on it, even if the entire simulation did not have time to finish.
When doing test iterations on your simulation setup, you can also speed up the simulation by enabling Cacheless Simulation from the Output rollout.
An alternative approach to Render On Each Sim Frame is to automatically start a sequence render after the entire simulation has finished by adding a 'max quick render' command under the OnSimulationEnd() callback of the Use Script option below.
Use Script | script, use_script – Enables the use of MAXScript during the simulation. Click Edit... to open a window with some skeleton code and a short description of the available commands. For more information, please see the Phoenix MaxScript page.
Threads Limit | maxthreads – Specifies an upper limit for the number of threads used for the simulation. When the value is set to 0, the maximum number of threads (cores) will be used.
NUMA Nodes – If the simulation is executed over a NUMA machine, you can specify which nodes will be used. Phoenix is very sensitive to memory transfer and if all the nodes are used, performance might decrease due to low bandwidth between the different nodes.
NUMA stands for Non-Uniform Memory Access. It can be used to restrict the threads used for simulation based on the physical CPUs available on the system (in a multiprocessor systems). In this way better memory access can be achieved when multiple simulations are run on the same machine.

Cache File Content
This area displays information on the current simulation. Any data from channels that have been loaded into the simulator are shown. This includes the minimum and maximum ranges for each channel. Check the Grid Channel Ranges and Particle Channel Ranges pages for more information.
Note that the Container Dimensions show the loaded cache size as seen in the scene, in the currently selected units. This size is not multiplied by the Scene Scale parameter from the Grid rollout. If you want to see how big the container is as seen by the Phoenix simulator when the Scene Scale parameter is used, check the X, Y, Z info in the Grid rollout.
