This page provides information on the Output rollout for a LiquidSim object.
Overview
The Output rollout holds the controls for the cache file export.
When you start a simulation, the simulator will typically output an entire animation sequence, which is saved onto your hard drive by default. That sequence is saved as individual files, called caches, which contain raw simulation data for each timeline frame.
The Output rollout lets you set the save path for the cache files, manage what data is written to those cache files, and determine their compression.
Specifically, the cache data consists of grids and particles, which describe the fluid’s behavior. For Liquid simulations, Particle Channels and Grid Channels are written to each cache file, which represent the properties of the simulated fluid at that frame.
In the Output rollout, you can choose which Particle Channels and Grid Channels to export to the cache files, based on your needs.
Phoenix Liquid simulators can simulate several particle system types: Liquid, Foam, Splash, Mist and Wetmap particles. Each of these particle systems contains Particle Channels for each particle, such as Position, Size, Age, ID, Velocity and so forth. The Output rollout lets you manage which of these are exported.
Likewise, there are several Grid Channel types, such as Liquid, Velocity, RGB and so on. For Liquid simulations, the Grid Channel data is built from the simulated particles, and then exported to the cache files in the form of a voxel grid, where the Grid channels are contained in each of the voxels.
Exporting the Grid Liquid Channel will automatically convert Liquid particles to a grid during export, which is why they can be rendered as a mesh and shaded using standard materials. In addition, the Liquid mesh can also be previewed in the viewport.
Note that only Liquid particles can be automatically converted to a grid. The other particle systems (e.g. Foam, Splash, Mist etc.) are exported only as particles, and must be shaded using the Particle Shader.
UI Path: ||Select Liquid Simulator object|| > Modify panel > Output rollout
Parameters
General
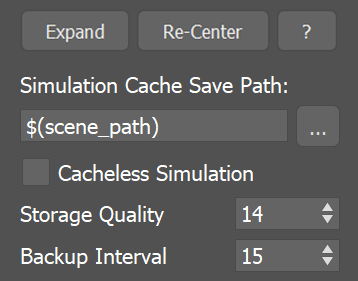
Expand – Opens a floating dialog that contains the selected rollout and automatically folds the command panel rollout.
Re-Center – Resets the position of the floating rollout.
? – Opens up the help documents for the Liquid Output.
Simulation Cache Save Path | simoutput – This is the directory and the name template for the output cache files. It uses the $(scene_path) macro by default, and there are also other available macros as listed below. To set up rendering and simulation cache paths manually, see How to change the default Phoenix paths on the Tips and Tricks page.
Since version 3.00.02, Phoenix can export VDB grid data. Check the How to export Phoenix FD simulation to OpenVDB format video.
Appending a .vdb extension after the Output Path tells Phoenix to write its data in the OpenVDB format.
Particle data can also be exported using the .aur or the .vdb format. Phoenix can convert particles from already simulated Phoenix .aur caches into the .prt format as a post-process using the Phoenix Export PRT Particles dialog or to .vdb format using the Cache Converter tool.

Clicking the "..." button will open a menu with the following options:

Browse - Opens a dialog where you can select where the simulation caches will be written to. The filename you type in must contain # signs so each simulation frame will be written to a differently numbered file. Also, you can choose between two file formats - AUR and VDB cache files. In order to write the simulation caches to VDB in the default simulation path, you can just edit the Simulation Cache Save Path to $(scene_path).vdb.
Delete Cache Files - Clears the cache files matching the provided Simulation Cache Save Path pattern.
Reset to Default - Resets the Simulation Cache Save Path to default.
Help - Opens this Help page.
Cacheless Simulation | cacheless – Only the last simulated frame will remain in RAM and no caches will be written to the storage. This will speed up simulations which are bound by slow reading or writing to the hard disk or by compression and decompression of the grid or particle data. You can use this option when iterating on the simulation settings in order to speed up your iterations. It can also be combined with the Render On Each Sim Frame option under the Simulation rollout, so you will get a ready image sequence if you leave the simulation unattended and then return to check it.
Storage Quality | storage_quality – The output grid and particle channels in AUR files are compressed by default in order to increase the performance (faster cache loading) and to avoid excessive memory consumption. This parameter can range from 8 to 20 - 8 is the smallest size, while 20 is the best quality and is uncompressed. If this value is set too low, different artifacts may start appearing depending on the type of scene. For grid channels, artifacts shaped like horizontal slices may appear in preview and rendering. For particle systems such as Liquid or Foam, the artifacts would look like ordered lines of particles (see the Particle compression artifacts example below).
Backup Interval | backup – The frame interval between backups of the full simulation state. A stopped simulation can be restarted from such frames (see the Restore option in the Simulation rollout). To make restoring possible from every frame, set this value to 1. A value of 0 means no backup frames will be exported.
Output Particles
Phoenix particle systems contain Particle Channels for each particle, which represent the properties of the fluid simulation. Each Particle Channel has its own range of possible values that is most efficient for that specific channel type (see the Particle Channel Ranges).
Here in the Output rollout, you can choose which Particle Channels will be exported to the cache files.
The particle export parameters share a user interface to keep the user interface compact. Each particle system can be selected individually from the drop-down list, and the output settings can be selected for that particle system. When a particle system is selected again, the same settings are retained.
Compress Particles | prtcompress – Enables compression of the simulated particle systems when they are written to AUR cache files. VDB cache files exported from Phoenix do not support particle compression. Simulations with very high particle counts, such as 50 million or more, will produce large caches, so particle compression will help reduce the cache sizes significantly. If you are writing or reading the cache files over the network or to a disk drive, this could significantly speed up simulation and rendering. However, if you are writing the simulation caches to an SSD drive or other fast storage, and you can afford to have large cache files, then disabling the compression could actually speed up the simulation.

Example: Particle compression artifacts
For particle systems such as Liquid or Foam, the artifacts would look like ordered lines of particles, as in the following comparison (click to zoom in):

Storage quality = 19

Storage quality = 14
(artifacts in the lower left corner)

Storage quality = 8
Note that writing more channels to the cache files takes more time and will add up to the simulation time, so if you know in advance that you will not be needing a certain channel for rendering, then it would help the simulation times if you turn it off.
Particle Velocity – The particle velocity channel will be exported. Use this option when you need motion blur for the particle systems such as Foam, Splash, etc.
Particle ID – The ID channel will be exported. This channel is used during rendering to identify each particle. Use it when render time size variation is needed, if you would use the Particle Shader's Count Multiplier, or when frame blending will be involved (animated frame index or non-integer play speed).
Particle Age – The particle age channel will be exported. This channel can be used for animation effect based on the particle age, which can be needed by the Phoenix Particle Texture, Phoenix Source, Particle Shader, or Particle Tuner.
The Age channel is affected by the Time Scale option under the Dynamics rollout which acts a multiplier for the Age.
Particle RGB – The particle RGB channel will be exported. You can use this for simulations where you are mixing different particle colors or you shade the particles by the particle RGB channel through a Particle Texture. Also, enable this if you want to be able to preview the RGB channel as a particle color in the viewport.
Particle Size – You would need this channel to be exported if you would like to use the simulated particle sizes when rendering. Note that the WetMap particle system does not export the Age channel and its Size channel decreases with time.
Particle Viscosity - The particle Viscosity channel will be exported. Enable this if your Resimulation requires the calculation of viscosity.
All the info from this section is kept in text form in a single text parameter, which is accessible through MAXScript under the name prt_expmask.
Grid channels
The fluid properties of a Phoenix simulation are written inside Grid Channels. Here you can choose which Grid Channels will be exported to the cache files, in the form of a voxel grid.
Each channel stores a type of value, such as Liquid, RGB, Velocity and so forth, with its own range of possible values that is most efficient for that specific channel type (see the Grid Channel Ranges). Phoenix determines the fluid’s behavior at a given time, based on the content of these Grid Channels.
Note that the more channels are used, the slower the simulation runs and the larger the output files are. While scrolling the timeline, you can check which channels are present in the loaded cache file for the current frame, from the Cache File Content list in the Simulation rollout.
Also note that in the case of FLIP / Liquid simulations, currently only Liquid particles can be automatically converted to a grid during export, while all the other systems (e.g. Foam, Splash, etc.) are exported only as particles.
Grid Liquid | keep_t – Export the liquid amount. This is needed so that you can render the Liquid as a mesh and also preview it as a mesh in the viewport.
Grid RGB | keep_rgb – Export the RGB color. You can use this for simulations where you are mixing different liquid colors or materials through a Phoenix FD Grid Texture.
Grid Velocity | keep _vxyz – Export the velocity. This is needed for motion blur of the liquid mesh.
Grid Viscosity | keep_visc - Export the Viscosity channel. Required for variable Viscosity simulations You may also choose to enable this if, for instance, your setup requires that you use the Viscosity channel as a mask through a Phoenix FD Grid Texture.
Grid Texture UVW | keep_texuvw – Export the Texture UVW channel. Enable this to generate texture mapping coordinates that follow the movement of the fluid.
Special | zmr – Export internal or special channels into the Special channel (alias to the Smoke channel) so they can be visualized using one of the volumetric shaders of the FireSmoke Simulator (with Mode set to Volumetric, Volumetric Geometry, or Volumetric Heat Haze). Such channels can also be read by the Grid Texture and used for rendering.
Solid Voxels – Exports the solid voxels as smoke. Voxels covered by many obstacles contain more smoke.
Divergence Symm – Exports the negative divergence of each voxel.
Divergence Smooth – Exports the blurred negative divergence of each voxel.
Vorticity – Exports the length of the curl of each voxel. Can be used for whitewater shading.
Vorticity Smooth – Exports the blurred length of the curl of each voxel. Can be used for whitewater shading.
Velocity Gradient – Exports the length of the gradient of the velocity field.
Injector – Exports the pressure term created by sources in Inject mode or formed during the simulation.
Liquid Surface – Exports the surface created by the simulation.
Solid Geom Type – Exports the internal geometry type in each voxel.
Hydrostatic Pressure – Exports the pressure of the liquid at each voxel due to the effect of gravity.
Voxelization Issues – Exports voxels where the solver would produce wrong results during simulation. Such voxels are near overlapping triangles, inverted normals, open edges or other geometry issues.

Using Environment Variables with Phoenix Paths
There are path environment variables in every OS, and they can be used with Phoenix cache file paths.
For example, to access environment variables in Windows 10 and Windows 8, follow these steps:
In Search, search for and then select: System (Control Panel).
Click the Advanced system settings link.
Click the Environment Variables... button.
In the System variables section, using Edit System Variable (or New System Variable) window, specify the value of the PATH environment variable.
Using this, you can create a path (variable), give it a name, and use it for cache files in Phoenix.
For example, the path D:\PhoenixFD\Cache can be given the environment variable name "Cache". In the Phoenix Simulator Output rollout, you can specify the Output Path as the following:
$env(Cache)\cache_name###.aur
This will save the Phoenix cache files in D:\PhoenixFD\Cache.
Note that in order to reference environment variables, the following pattern must be used:
$env(<variable_name>)