This page provides details on the settings available for the Stochastic Flakes Material in V-Ray for Cinema 4D.
Overview
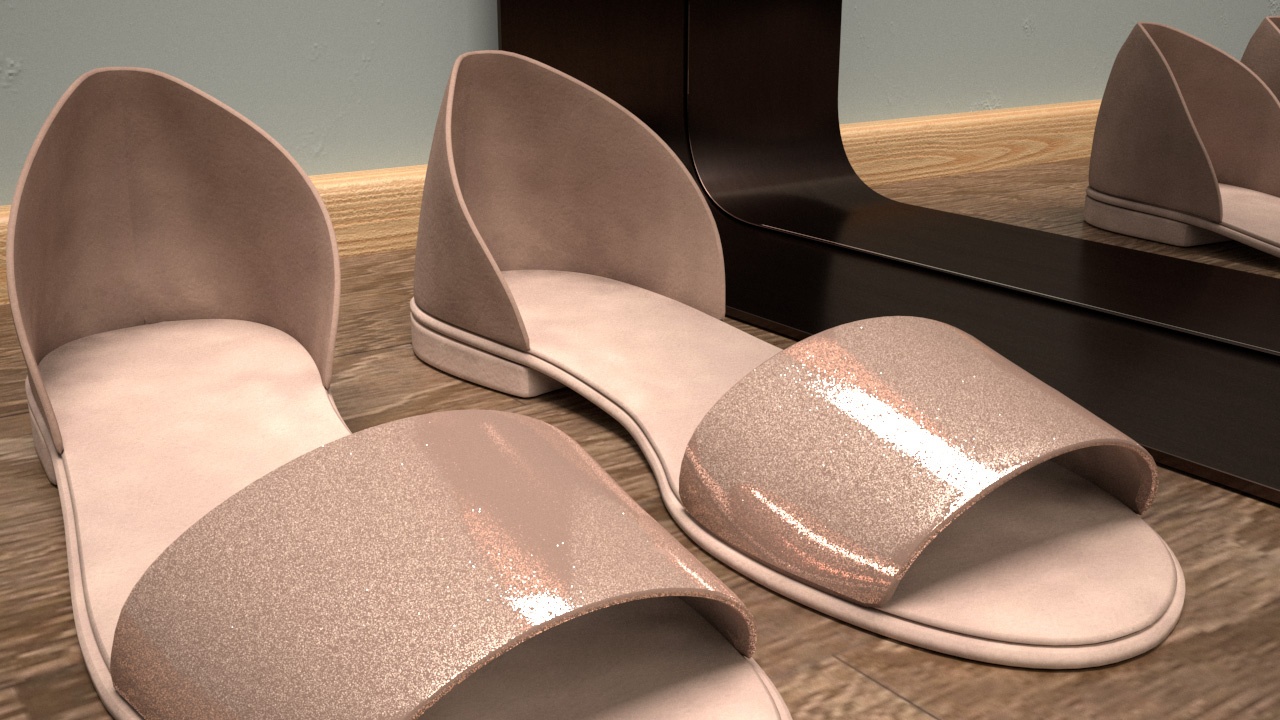
The Stochastic Flakes material can be used to simulate car paints, snow and other glittery materials. It works by simulating at render time the aggregated effect of a large number of mirror-like flakes scattered over the surface of an object. The material is somewhat similar to Car Paint 2 material, but uses less memory. The term stochastic means "using a random variable".

UI Paths
||V-Ray|| > Stochastic Flakes

||Create|| > V-Ray > Stochastic Flakes (disabled Separate menu for V-Ray materials)

Basic Parameters
Enable Flakes – When enabled, the material simulates flakes scattered on the surface of the object. If disabled, the material renders the specified BRDF type with the specified glossiness. See the Enable Flakes example below for more information.
Number of Flakes – The number of flakes, expressed as the square root of the actual number of flakes in the unit texture square. For example, a value of 3000 generates 9,000,000 flakes in the unit texture square. The number of flakes is restricted to 231 (a little over 2 billion), which means the highest useful value for Number of Flakes is 46340. If you need more than 2 billion flakes, increase the Flake Scale parameter. See the Number of Scale example below for more information.
Hilight Glossiness – Controls the distribution of the flakes. Values close to 1.0 orient all flakes with normals pointing more perpendicular to the surface, whereas lower values randomize the normals of the flakes. See the Highlight glossiness example below for more information.
Blur Angle – Controls the "softening" of the flakes effect. Higher values produce softer results, while smaller values make the flakes sharper. Usually, values between 0.5 and 8 are used. See the Blur Angle example below for more information.
Subdivs – Determines the number of samples around each flake.
Reflect Filter – Specifies the reflection color of the flakes.
Texture – Specifies a texture file to be used for the reflection filter.
Mix Strength – Specifies a blend amount for the texture map.
Mapping Type – Specifies the way the flakes are scattered on the surface:
Mapping Channel – The flakes are mapped according to the specified mapping channel. The density of the flakes on the surface depends on the way the UVs follow the surface.
Triplanar – The material uses triplanar mapping to create the flakes. This mode is useful for objects that don't have suitable UV mapping.
Map Channel – Specifies which map channel to use when Mapping Type is set to Mapping channel.
Flake Scale – Controls the scale of the texture space. When Mapping Type is set to Mapping channel, a value of 1.0 is recommended. For Triplanar mapping, the Number of Flakes amount is distributed in each square unit in local object coordinates. In this case it is necessary to lower the Flake Scale value to 0.05, 0.01, or even less, and increase the Number of Flakes value depending on the object size, especially if square artifacts are observed.
BRDF Type – Specifies the BRDF used to guide the distribution of the flakes:
GGX – Uses GGX distribution for the flakes (the GGX distribution has a longer "tail" compared to Beckmann).
Beckmann – Uses a Beckmann distribution for the flakes.
Seed – The seed for the randomization of flakes. Changing this value produces different flake patterns.

Example: Enable Flakes
The Enable Flakes parameter allows the user to turn the Stochastic Flakes effect on and off. When on, flakes are scattered across the surface of the material. When off, the material renders with only the specified BRDF Type and Hilight Glossiness. In the example below, the BRDF Type is set to GGX. Click on the image to open the full-resolution.


Example: Number of Flakes
In this example, the Mapping Type is set to Mapping Channel and the Flake Scale is set to 1. Notice how the size of the flakes changes with the change in the Number of Flakes parameter.

Number of Flakes = 2236 (5,000,000 flakes per unit texture square)

Number of Flakes = 7070 (50,000,000 flakes)

Number of Flakes = 22360 (500,000,000 flakes)
Example: Hilight Glossiness
Assign a higher value to the Hilight Glossiness parameter to achieve a better defined, concentrated highlight over the Stochastic Flakes material. Assign a lower value to have a more dispersed highlight effect.

Hilight Glossiness = 0.6

Hilight Glossiness = 0.8

Hilight Glossiness = 0.95
Example: Blur Angle
Blur Angle = 0.5

Blur Angle = 4.0

Blur Angle = 8.0
Colored Flakes Parameters
The Colored Flakes parameters control the color, random hue and lightness of the flakes. The correct physical behavior is that the material appears darker, since the colored flakes/mirrors reflect only certain parts of the spectrum. When viewed from a distance, the aggregate color of the material converges to the average color of the flakes.
Colored Flakes – Dropdown to enable Colored Flakes.
Off – No variance to the specified color of the flakes is applied.
Random Hue – Enables randomized hue for the flakes.
Random from Map – Enables the use of a texture map for randomized colors.
Saturation – Determines the saturation variation of the colors for all flakes.
Lightness – Controls the lightness variation of the colors for all flakes.
Random Color Map – Available when Colored Flakes is set to Random from Map. Specifies a texture from which random colors are sampled and applied to the flake color.
White Average – When enabled, renders colored flakes without the darkening effect. Note that this is not physically correct.
Tex Subdivs – Specifies the subdivision of a unit square in texture space. Increase the value only if you observe square-like artifacts in zoomed regions.

Example: Random Color Map
The Random Color Map parameter allows the user to provide a texture map for randomizing the stochastic flakes colors. It is only accessible when Colored Flakes is set to Random from Map. Random colors are generated by sampling the horizontal row of pixels at the very top of the map along the U-axis. The sample area is only 1 pixel tall; the rest of the map is ignored.

The example below illustrates how the same ramp produces different flake color results, depending on the ramp type. A U Ramp produces multi-colored flakes, while a V ramp produces single-color flakes. The Stochastic Flakes Material is used as the base material of a Blend Material with a lightly reflective V-Ray Material as the coat.

Input ramp using U space

Multi-colored flakes are produced. Click on the image to see it in its full size.

Input ramp using V space

Only yellow-colored flakes are produced. Click on the image to see it in its full size.
Advanced Parameters
Blend Min – Specifies the number of flakes per pixel, below which the flakes are computed. When the number of flakes per pixel is above this value, the material gradually transitions into a smooth (non-discrete) BRDF.
Blend Max – Specifies the number of flakes per pixel, above which the material only computes a smooth (non-discrete) BRDF. If the number of flakes per pixel is below this value, the material gradually transitions into discrete flakes.

Enable Outlines – When enabled, adds outlines to the object the material is applied to. This option is disabled by default. Line Color – Determines the color of the outlines. A Texture can be applied. Line Width – Determines the width of the outlines in pixels. The soft limit is 100. Click on the Opacity – Determines how opaque the lines are. Click on the Outer Overlap Threshold – Determines when outlines are created for overlapping parts of the object. Lower values reduce the outer overlapping lines, while higher values produce more overlapping outer lines. Normal Threshold – Determines at what point lines are created for parts of the object with varying surface normals (for example, at the inside edges of a box). Lower values mean that only sharper normals generate an edge, while a value of 0.5 means that 90 degrees or larger angles generate internal lines. Higher values mean that smoother normals can also generate an edge. Don't set this value to pure 1.0, as this fills curved objects completely. Overlap Threshold – Determines when outlines are created for overlapping parts of the object. Lower values reduce the internal overlapping lines, while higher values produce more overlapping lines. Don't set this value to pure 1.0, as this fills the objects completely. Inner Line Control – When enabled, allows the inner line to be edited further. This option is disabled by default. Inner Line Color – Determines the color of the inner lines. A Texture can be attached Inner Line Width – Determines the width of the inner lines in pixels. Click on the Outlines
![]() arrow to expand. A Texture can be applied.
arrow to expand. A Texture can be applied.![]() arrow to expand. You can attach a Texture for the opacity. The Mix Strength option determines the percentage of blending between the Opacity value and the texture.
arrow to expand. You can attach a Texture for the opacity. The Mix Strength option determines the percentage of blending between the Opacity value and the texture.
Inner Line Control
![]() arrow to expand for the Texture option, where you can attach a texture to serve as the inner line width.
arrow to expand for the Texture option, where you can attach a texture to serve as the inner line width.
Options
Material ID – The color used by the Material ID render element. You can also use a shader here.
Multimatte ID – The integer ID of the material to be used by the Multi Matte render element.
Round Edges Enabled – Enables the Round Edges effect, which uses bump mapping to smooth out the edges of the geometry during render time.
Radius – Specify a radius (in world units) for the Round Edges effect. Since the actual geometry is not being changed and only the normals of the faces are affected, large values may produce undesirable effects.
Consider Same Object Only – When enabled, the rounded corners are produced only along edges that belong to the object, which has the attribute applied. When disabled, rounded corners are also produced along edges formed when the object with the attribute intersects other objects in the scene.
Corners – Choose which edges are considered in the calculation. Possible options are:
Covex and Concave – Considers all edges.
Convex Only – Only applies Round Edges effect to edges with convex angles.
Concave Only – Only applies Round Edges effect to edges with concave angles.

Preview Settings
Override Preferences – When enabled, the parameters in this tab override the global preferences of the scene for the selected material.
Enable Preview – When disabled, the previews of the material in the Viewport and the Material Editor are disabled. The material is displayed in all black. This saves on processing power.
Enable Global Illumination – When disabled, global illumination is not calculated for the current material preview.
Quality – Determines the quality of the material previews. Higher values give more detail but slow down processing.
Editor Map Size – Determines the resolution of the material preview. If you have extra-detailed textures applied to the material, this option allows you to preview those textures in higher resolution at the preview step, without needing to render.
Default
64×64 (16 KB)
128x128 (64 KB)
256x256 (256 KB)
512x512 (1 MB)
1024x1024 (4 MB)
2048x2048 (16 MB)
4096x4096 (64 MB)

References
The V-Ray Stochastic Flakes Material is based on the Chaos paper "A Practical Stochastic Algorithm for Rendering Mirror-Like Flakes" (PDF Download).