This page provides an overview of the Common tab of the Render Settings.
Overview
This tab of the Render Settings holds common options for outputting files, like renders or textures. It also allows for MEL and Python scripts to be executed during the rendering process. For information about using Python with this feature, see the Python Access to the Translated V-Ray Scene page.
The Common tab also provides access the following windows:
- Image Format Options - Additional settings for the selected output image format. Includes settings like quality and compression.
- Ptex Baking Options - Additional settings for when the texture Baking engine is set to Ptex Baking.
UI Path: ||Render Settings window|| > Common tab


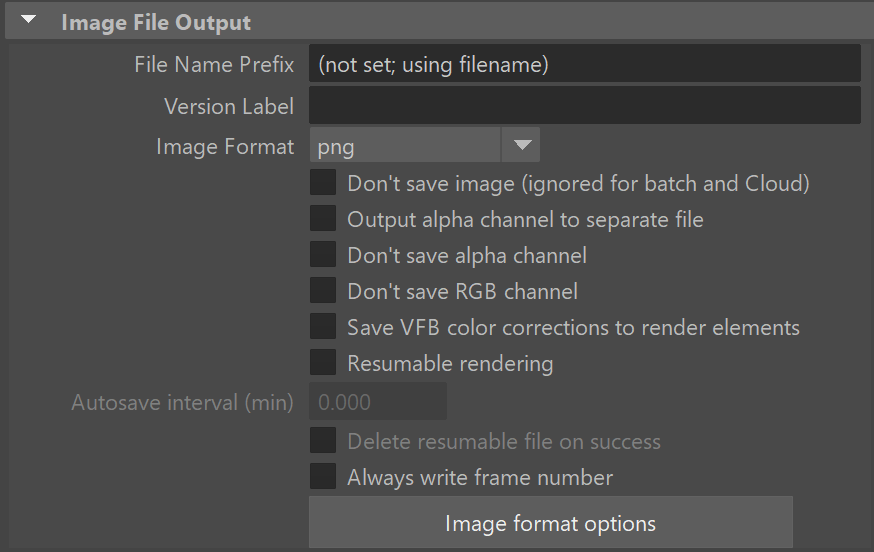
Image File Output
File Name Prefix – Specifies the file name of the rendered image and allows adding any prefixes or suffixes to it, including some special keywords. You can add predefined keywords by right-clicking in this field and choosing from the available options. For more information, see the File Name Prefix example below.
Note: New scenes saved with V-Ray will rely on users to specify the render layer keyword <Layer> when saving with an absolute path. If it is not explicitly specified, V-Ray will warn users that files may be overwritten as a result. Older V-Ray scenes rendering with an absolute path will warn users that they use a deprecated method of handling render layers where new folders are implicitly created for each render layer. To remove this warning, run the command vrayUpgradeToExplicitLayerToken(). This will update the file to the current method of handling render layers and automatically add the _<Layer> keyword to the file name.
Version label – Entered text will be used to replace the <Version> keyword in the File Name Prefix field.
Image Format – Specifies the file format in which the image(s) will be saved.
Check out how to export exr (multichannel) and exr (deep) files at the same time, explained in the Exporting EXR and Deep EXR in One Render tutorial.
Don't save image (ignored in batch mode) – When enabled, the final image will not be saved automatically.
Output alpha channel to a separate file – When enabled, the alpha channel of the rendered image will be saved to a separate file.
Don't save Alpha channel – When enabled, the Alpha channels will not be saved (ignored with multichannel exr and vrimg).
Don't save RGB channel – When enabled, the RGB channels will not be saved (ignored with multichannel exr and vrimg).
Save VFB color corrections to render elements - when enabled, allows the application of color corrections on auto-saved exports (vray/maya batch/std). Note that this option does not apply the color correction to the export when saving manually. To do so, another option can be used in the VFB > File > Save VFB color corrections to render elements. Visit the V-Ray Frame Buffer page for more information.
Resumable rendering – If there is a resumable file existing for the current frame, the rendering will be resumed from it. Otherwise a new render will be started and resumable files will be saved. If the rendering is already complete, the frame will be skipped and the next one (if any) will be started. For more information on resumable rendering, see the Continue a render with Resumable Rendering tutorial.
Note: Resumable information is stored in additional .vrimg or .vrprog files if the output file location has not changed. Resuming a render with bucket sampling will use and create additional .vrimg files. Resuming a render with progressive sampling will use and create separate .vrprog (progressive resumable) files. For instance, if resumable rendering is enabled when rendering to a PNG file format using the progressive sampler, resumable information will be saved as a .vrprog file along with the output PNG.
Autosave interval (min) – Specifies an interval in minutes for saving resumable files during rendering. This parameter applies only to Progressive sampling. A value of 0 disables autosaving during rendering and resumable files will be saved only at the end of the rendering.
Delete resumable file on success – When enabled, deletes the resumable file (either .vrimg or .vrprog) upon completion of the render.
Always write frame number – When enabled, writes the frame number of each output file, even if a single frame is rendered.
For more information, see Image Format Options.
Example: File Name Prefix
The File Name Prefix field offers numerous options for customizing the path and file name of rendered images. If you leave this field blank, V-Ray will use the scene file name for the rendered image. By default, rendered images will be saved in the current project's images folder, and V-Ray will automatically create the folder if it does not exist. For example, if you specify only a file name (e.g. myImage), V-Ray will save the image as project_path/images/myImage.ext.
Example 1
Using Predefined Keywords
A list of keywords can be accessed by right-clicking the field.
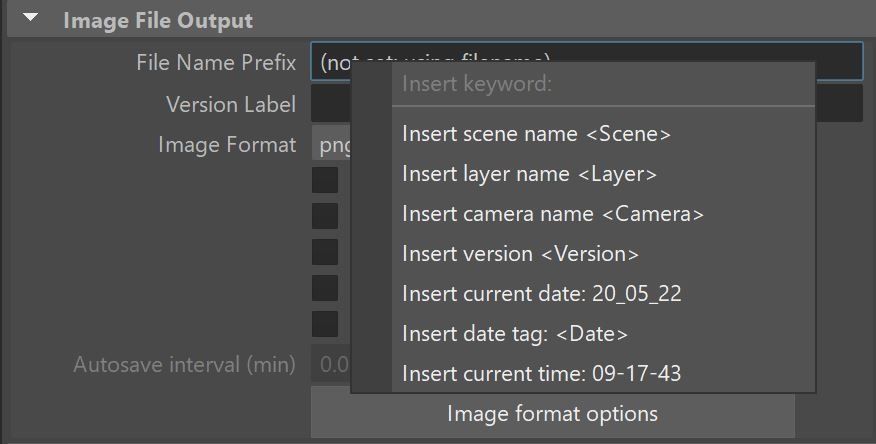
Available Prefix Keywords
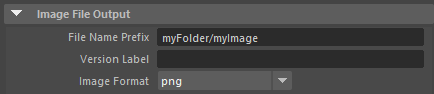
Example 2
Specifying a Relative Path
If you try to create a subfolder or specify a relative path to save the image, V-Ray will automatically create the respective folders in the project folder if they do not exist.
For example, when specifying both a relative path and filename (e.g. myFolder/myImage), V-Ray will save myImage.ext in a folder called myFolder in your project like this: project_path/myFolder/myImage.ext. If the folder myFolder doesn't exist, V-Ray will create it for you.
Animated sequence with relative path

Result in Project Folder
Example 3
Specifying an Absolute Path
When specifying an absolute path, V-Ray will not use your project folder. Instead, it will create a file myImage.ext in the path you've specified, and any non-existing folders will be automatically created.
For example, if you specify an absolute path and filename (e.g. C:/myFolder/myImage), V-Ray will save myImage.ext in a folder called myFolder on the C drive as such: C:/myFolder/myImage.ext. If the folder myFolder doesn't exist, V-Ray will create it for you.

Animated sequence with absolute path

Result in Specified Path
Example 4
Automatic tmp or Render Layer Names
V-Ray will include tmp in the names of folders or images in some specific cases. For older scenes, V-Ray will include the name of the render layer in automatically created folders. This is dependent on whether you are rendering a single frame from the Maya GUI, rendering animation from the GUI, or batch rendering, and whether you're saving your image relative to the project path or saving it to an absolute path.
- When rendering a single frame from the GUI and using your project path, V-Ray saves out the image file to a tmp folder in your project, e.g. project_root/images/tmp/filename.ext or to any subfolder of the images directory if specified (e.g. project_root/imates/tmp/scene_name/filename.ext).
- When rendering a single frame from the GUI and using an absolute path, V-Ray saves out the image file with tmp appended to the image file name, instead of the folder name.
- When rendering animation (or when doing a batch render), V-Ray saves out the image file without including tmp in the folder or file names.

Auto-created tmp folder when rendering a single frame from the Maya GUI and saving it to the project path.
Translator
The Translator rollout expands when Export to a .vrscene file is enabled
Render – Enables V-Ray to render the image to the frame buffer and then save an image file as specified in the Common tab of the Render Settings window. This option can be used at the same time as Export to a .vrscene file.
Export to a .vrscene file – Enables V-Ray to export the scene to a .vrscene file and expands the options in the rollout.
File name – Specifies the location and name for the .vrscene file.
Separate files – When enabled, V-Ray will export separate files for different components of the scene. This also allows you to disable export for certain types of objects.
Each frame in separate file – When enabled, V-Ray will make a separate file for each rendered frame.
Strip paths – When enabled, the paths for assets (bitmap textures, proxies, GI caches loaded from file, etc.) are removed from the exported file and only the file names of the assets remain.
Write mesh data in hex format – When enabled (the default), the mesh data will be written in hexadecimal format in the .vrscene file. This makes the files smaller and faster for processing, but less readable to a user. When disabled, the mesh data will be written in normal decimal format.
Write transform data in hex format – When enabled (the default), transform data will be written in hexadecimal format in the .vrscene file. This makes the files smaller and faster for processing, but less readable to a user. When disabled, the data will be written in normal decimal format.
Compressed – When enabled, basic compression will be applied to the .vrscene file. This option can only be used together with Write mesh data in hex format.
Plugin Names Prefix – Allows the user to specify a prefix for plugin names.
![]()
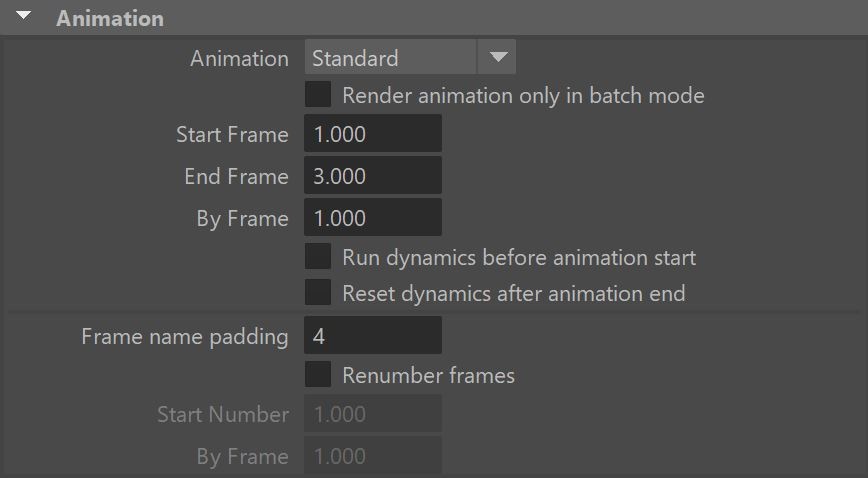
Animation
Animation – Controls the rendering of animated sequences.
Disabled – Rendering of animations is disabled - only the current frame is rendered.
Standard – Renders an animation by specifying an animation range and frame increment.
Specific Frames – Renders only specific frames of the animation. For more information, please see Animation with Specific Frames details below.
Render animation only in batch mode – Enables rendering of animations only in batch mode or for Chaos Cloud. Otherwise, the render window will render all frames between Start Frame and End Frame. This may give the appearance of long render times.
Start Frame – Specifies the first frame of the animation.
End Frame – Specifies the last frame of the animation.
By Frame – The increment between the frames you want to render. The default value is 1.
Run dynamics before animation start – Runs dynamic simulations (particles and fluids) from the current time to the animation start before the rendering starts.
Run dynamics after animation end – Runs dynamic simulations (particles and fluids) from the animation end to the current time after the rendering finishes. For more information, please see Rendering Animation with Dynamic Sims details below.
File Name Padding – The number of digits in frame number extensions. For example, if the file name is set to "name", and Frame Padding is set to 3, Maya names rendered image files name.001, name.002, and so on.
Renumber frames – Enables the frame numbers of the saved images to be different from the frame numbers in the scene file.
Start Number – The number from which to start renumbering the frames.
By Frame – The increment between numbers to be used in renumbering the frames.
V-Ray doesn't support fractional start/end/by frame, and only the integer part of the number will be actually used. This is to prevent issues with distributed rendering since different machines can do floating point calculations slightly differently.
Example: Rendering Animation with Dynamic Sims

These two options determine whether and how Maya will run all dynamic simulations before and after rendering. They are useful in cases where you have Maya fluids or particles in the scene that don't use cache. These options can be used separately or in combination.
Example 1
Rendering animation with particles for frames 10-20. Current time is frame 5
Enabling Run dynamics before animation start will simulate the particles between frames 5 and 10 before rendering. Then the animation will be rendered for frames 10 to 20.
Additionally, enabling Run dynamics after animation end will simulate the particles between the timeline start and the current frame after the rendering is finished - in this case between frames 1 and 5. This way, after the rendering is complete, the simulation will be left at the same state it was before the rendering.
Enabling both options will result in having both behaviors before and after the rendering. Enabling only the option to Run dynamics after animation end in this case will skip the simulation between frames 5 and 10.
Example 2
Rendering animation with particles for frames 10-20. Current time is frame 15
Enabling Run dynamics before animation start will replay the simulation from frame 1 to 10. Then the animation will be rendered for frames 10 to 20.
Additionally, enabling Run dynamics after animation end here will simulate the particles between 1 and 15 again after the rendering finishes.
Enabling both options here will result in having both behaviors before and after the rendering. Enabling only the option to Run dynamics after animation end in this case will skip the simulation between frames 1 and 10.
Example 3
Rendering animation with particles for frames 10-20. Current time is frame 25
Enabling Run dynamics before animation start will replay the simulation from frame 1 to 10. Then the animation will be rendered for frames 10 to 20.
Additionally, enabling Run dynamics after animation end here will simulate the particles between 1 and 25 again after the rendering finishes.
Enabling both options here will result in having both behaviors before and after the rendering. Enabling only the option to Run dynamics after animation end in this case will skip the simulation between frames 1 and 10.
Example: Animation with Specific Frames

Frames – When the Animation parameter is set to Specific Frames, this specifies which frames to render. The proper format is: "from - to, increment; from-to, increment;..." For example "1-20;2" renders frames from 1 to 20 by an increment of 2.
Baking Engine Settings
Baking a texture with the settings selected here work with the resolution specified in the Common tab and for the selected object only. Note that the resolution should always be with square aspect ratio (1:1). For workflow steps and texture baking with the means of creating nodes, please see the Texture Baking page.
Baking engine – Selects the baking engine type.
None – No additional exporting will happen during render times.
Texture Baking – A texture will be baked for the selected object.
Bake to vertex color set – Bakes a vertex color set.
Ptex Baking – A .ptex file will be baked for the selected object(s).
U min /V min/U max/V max – Specifies a custom layout to which the texture will be baked.
Bake channel – Determines the channel to bake.
Edge padding (dilation) – The number of pixels to expand around geometry.
Shoot rays from camera – When enabled, the baking engine will use rays whose direction originates from the camera. As a result, the object will be baked as seen by the camera.
Color set name – When Bake to vertex color set is selected, this specifies the name of the vertex color set.
Bake RGB color – Bakes the RGB information to the map.
Bake alpha – Bakes the Alpha information to the map.
Ptex baking options – Opens the options dialog for Ptex baking.
For more details, see Ptex Baking Options.

Renderable Cameras
Renderable Camera works only for Batch rendering.
Renderable Camera – Determines the camera that will be used to render from. Drop-down lists all available cameras in the scene.

Resolution
Presets – Selects from several resolution presets.
Maintain Height/Width Ratio – When enabled, adjusting either the Width or the Height will automatically change the other parameter in order to keep the resolution ratio.
Maintain ratio – Specifies which ratio will be preserved when changing the image resolution.
Pixel aspect – The pixel aspect will be preserved.
Device aspect – The device aspect will be preserved.
Width – Specifies the width of the rendered image in pixels.
Height – Specifies the height of the rendered image in pixels.
Device Aspect Ratio – Sets a Device aspect ratio.
Pixel Aspect Ratio – Specifies the pixel aspect ratio.

Render View
Convert image to sRBG for RenderView – When enabled, V-Ray will automatically convert the image to the sRGB color space in the Maya Render View window.
Clear Frame Buffers – Clears the V-Ray VFB and Maya Render View render buffers before rendering.
Use V-Ray VFB – When enabled, V-Ray will render the image in the V-Ray VFB.
Memory frame buffer – When the image is saved as either .vrimg or multichannel .exr the information is written bucket by bucket directly on the hard drive. This specifies how V-Ray will utilize the Virtual Frame Buffer in order to optimize memory usage.
None – V-Ray doesn't display the image in the VFB in order to minimize memory usage.
Full – The full image is displayed - no memory optimization.
Preview – A lower resolution version of the rendered output is shown in the VFB to minimize memory usage.
Hide Render View – When enabled, the default Maya render view will not be displayed.
Hide V-Ray VFB in batch mode – Disables the Virtual frame buffer in batch rendering mode. Currently, the V-Ray VFB is always hidden in batch rendering mode.
Disable region for batch and Chaos Cloud – Disables the region rendering in batch rendering mode and for Chaos Cloud.
Sync VFB and Maya Color Management – When enabled, it synchronizes the OCIO settings between VFB Display Correction and Maya Color Management Preferences.
Show V-Ray VFB – Opens the V-Ray VFB window.
Reset V-Ray VFB – Resets the VFB settings and position.

Scene Assembly
Render representation – Specifies which Scene Assembly representations to use at render time.
Active Representation – Specifies that Active Representations in the scene are used at render time.
Custom – Type in the additional fields to create a filter that specifies which representations to use at render time.
Representation Name – The representation to render has the specified Name.
Representation Label – The representation to render has the specified Label.
Representation Type – The representation to render is of the specified Type.
Use Regular Expressions – When enabled, Maya uses the expressions in the Representation Name, Representation Label, and Representation Type fields to specify which representations to use at render time.

MEL/Python Callbacks
This part of the Common settings allows you to attach different MEL scripts that will be executed at certain points during the rendering process.
Pre Render MEL – The specific MEL script will be executed before the rendering takes place.
Post Render MEL – The specific MEL script will be executed after the rendering takes place.
Pre Render Layer MEL – The specific MEL script will be executed before rendering each Render Layer.
Post Render Layer MEL – The specific MEL script will be executed after rendering each Render Layer.
Pre Render Frame MEL – The specific MEL script will be executed before rendering each Frame.
Post Render Frame MEL – The specific MEL script will be executed after rendering each Frame.
Pre Key-frame MEL – The specific MEL script will be executed after the Pre Frame MEL script for every key-frame. If motion blur is enabled, then this script will be executed before each key-frame in the motion blur interval.
IPR Image Ready MEL – The specific MEL script is executed when IPR completes an image (either by reaching the maximum allowed render time, or the specified number of samples per pixel).
Post Translate Python Script – The specific Python script is executed after the Maya scene is translated for V-Ray, but before any rendering occurs.
For more details, see Python Access to the Translated V-Ray Scene.
