This page provides information on the Distributed Rendering rollout in the Render Settings.
Overview
Distributed rendering is a technique for distributing a single render job within a single frame across many computers in a network. For more information, please see the Distributed Rendering page in the Rendering and Post-Processing section of this documentation.
UI Path: ||Render Settings window|| > Settings tab > Distributed rendering rollout


Parameters
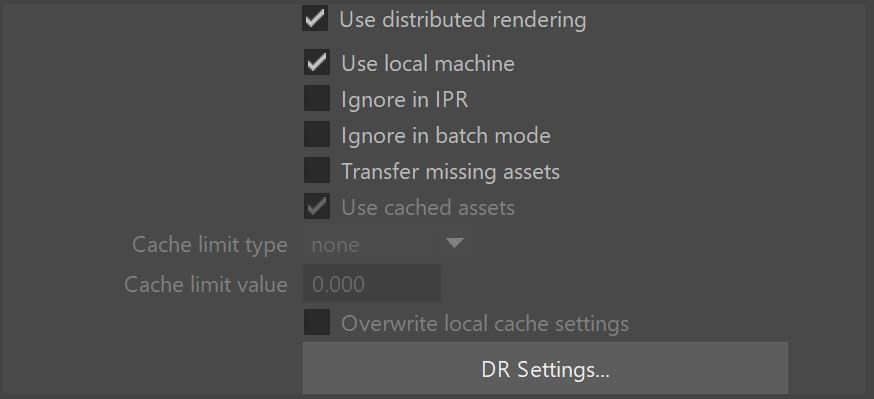
Use distributed rendering – Enables additional parameters and settings needed to distribute the rendering across additional computers. Note: The vray_dr_list.xml file store the settings information for your DR setup.
Use local machine – The client/local machine will function as a render server along with the other computers used to complete the rendering task. Disabling will mean all rendering will be done on other machines apart of the DR set up.
Ignore in IPR – When enabled, IPR will only run on the local machine rather than the whole distributed rendering network.
Ignore in batch mode – Distributed rendering will not be utilized when rendering is set to Batch Mode.
Transfer missing assets – Allows render servers to automatically download missing rendering assets from the client machine, including textures, V-Ray proxy files, IES profiles, GI solution caches (irradiance maps, light caches), etc.
Used cached assets – Tells the render servers to keep the downloaded rendering assets between different DR sessions. If disabled, the render assets are automatically deleted once the render server disconnects from the client machine at the end of the rendering. When enabled, assets are kept in a folder on disk. By default, it is named vray_assets_cache located in the temporary folder for the user that runs the V-Ray DR spawner. The location of the assets cache can be modified with the environment variable VRAY_ASSETS_CACHE_PATH. Modified assets are generally detected and re-transferred to the render servers even though they may already exist in the render servers' caches.
Cache limit type – Allows you to specify under what conditions the assets cache is cleaned up. The possible values are:
None – Assets are never deleted from the render servers' cache.
Age (hours) – Assets are kept for the specified amount of time. At the end of the rendering, the render servers will delete assets that have been transferred before the specified time limit.
Size (GB) – When the size of the assets on a render server exceeds the specified amount, least recently used assets are automatically deleted at the end of each render until the folder size is less than the limit.
Cache limit value – The specific value of the limit for the asset cache. This is either hours or GB, depending on the value of Cache limit type.
Overwrite local cache settings – Available when Transfer missing assets and Use Cached Assets is enabled. Enabling will make the render nodes ignore their local settings for how long they'll keep a transferred asset if any such settings have been placed. Instead, the nodes will use the settings from the host's Maya render settings.
Distributed Rendering Settings
This window is opened by clicking the Settings... button. These options set the machines V-Ray will use for Distributed Rendering.
These settings can be adjusted while V-Ray is rendering. Note that progressive production mode and IPR (CPU and GPU) mode only allow adding and enabling servers on the fly. CPU Bucket mode supports both adding and removing servers on the fly.
Server name or IP address – A text field to enter the name or IP address of the machine to use as a DR server.
Port number – Specifies the port number where the DR server operates.
Server alias/description – A text field to place notes about the particular DR server.
Add server – Allows a manual way to add a server by entering its IP address or network name.
Remove server –Deletes the currently selected server(s) from the list.
Toggle status – Toggles the state of the selected server(s) between enabled and disabled.
Edit – Modifies the information for the selected entry in the list.
Limit used DR servers – When several DR servers are available, sets an upper limit to the number of servers used for rendering.
Sort list by – Organizes the server list by Server name / IP address, Port number, Status or Server alias/description.
Resolve servers – Refreshes the list of server names to IP addresses.
Close – Closes the Distributed Rendering settings window.

Step-by-Step DR Set Up
1. Set-up the Render Servers. You can do that in two different ways.
1.1 Start the render servers as specified in the table on the Distributed Rendering page.
1.2 Start the V-Ray Stand Alone and enter the "vray -server" command in the command prompt.
2. Set-up the Render Client. In the Maya interface, open the Render Settings window, in the Settings tab under the System rollout click on the Settings button in the Distributed Rendering group. Add all the Render Servers by inputting their IP's in the Add Server name or IP field and click on the Add Server button. You can include or exclude the servers in the list in the current rendering by selecting them from the list and toggling the Toggle Status button.
XML Configuration File
Distributed Rendering settings are no longer saved in a collection of .tmp files but instead, are all included in a single XML file called vray_dr_list.xml. If an XML file is not found, V-Ray will print a warning and automatically convert old .tmp files to XML. The default XML location is as follows:
Windows: C:\Users\<username>\Documents\maya
Linux: /home/<username>/maya
OS X: /Users/<username>/Library/Preferences/Autodesk/maya
In addition, the environment variable VRAY_FOR_MAYA_DRLISTS_PATH can be used to set an alternate XML file path. This allows multiple users to use their own DR settings on the same machine.
The following is an example of an XML configuration file that can be downloaded here:
<?xml version='1.0' encoding='UTF-8'?>
<hostlist>
<serversLimit>4</serversLimit>
<server>
<host>someaddress</host>
<port>20207</port>
<alias>render host name here</alias>
<enabled>0</enabled>
</server>
<server>
<host>127.0.0.1</host>
<port>20207</port>
<alias>My own computer</alias>
<enabled>1</enabled>
</server>
</hostlist>
For users who do not wish to switch to the new XML method, V-Ray provides Python functions for compatibility. These are mentioned in a warning after the first automatic file conversion. First, the vray module must be imported:
import vray
To convert an XML file back to TMP use the following:
vray.vray_dr_manager.vrayDRConvertXMLToTmp()
To convert a TMP file to XML use this function:
vray.vray_dr_manager.vrayDRConvertTmpToXML()
Notes
When you cancel a DR rendering, it may take some time for the render servers to finish working and they may not be immediately available for another render.
Servers can be added, removed, enabled, and disabled while running a distributed render. During a progressive or IPR rendering, nodes can only be added or enabled while rendering. While rendering, some of the options will be disabled. Stop the render to make adjustments to such options.
Distributed rendering on macOS via Autodesk Backburner requires special settings. See the Distributed Rendering page for more information.