The V-Ray Denoiser Render Element removes noise from other render elements and saves its results in a few different ways.
Overview
The V-Ray Denoiser takes an existing render and applies a denoising operation to it after the image is completely rendered out via normal means. The denoising operation detects areas where noise is present and smooths them out. Images can also be denoised using the Standalone Denoise Tool included with the installation of V-Ray for Maya.
Because the V-Ray Denoiser operates on other render elements (like RGB_Color ) rather than being part of the rendering process itself, the denoising operation does not require re-rendering of the scene.
There are three denoising engines to choose from - the Default V-Ray denoiser, the NVIDIA AI denoiser (V-Ray's implementation of NVIDIA's AI-based denoising algorithm) and the Intel Open Image denoiser (V-Ray's implementation of the Intel® Open Image Denoise). See the Denoising Engines section for more information.
The V-Ray Denoiser has three preset options for its settings: Default, Mild, and Strong. Parameters can also be adjusted directly by using the Custom preset.

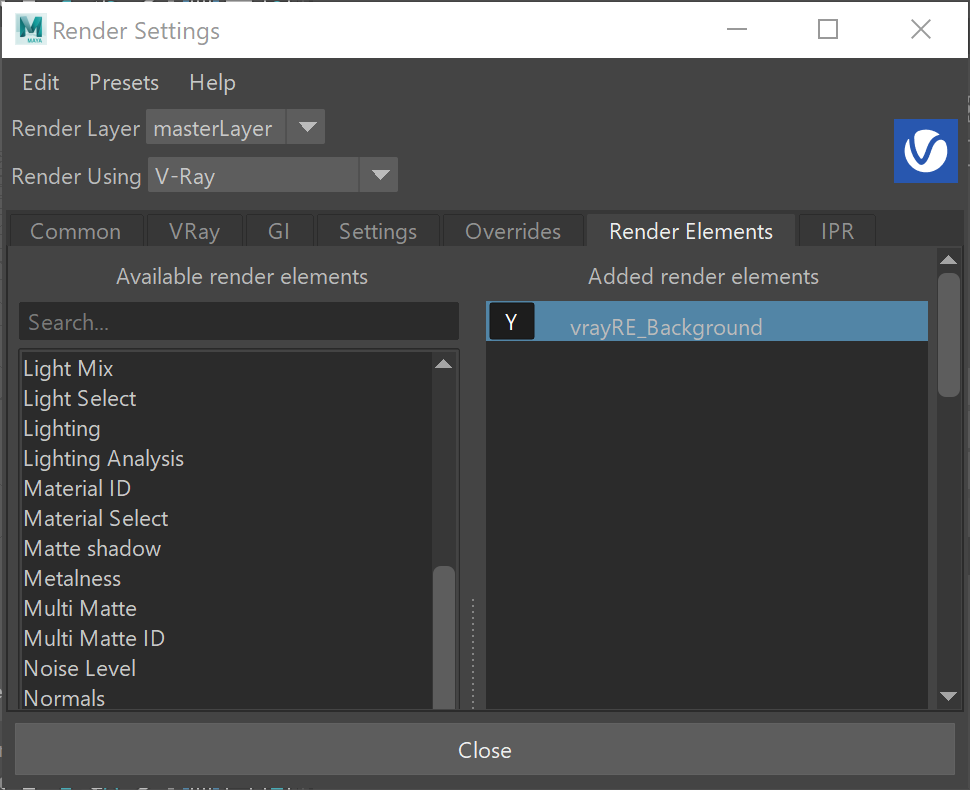
To use render elements, select from the Available render elements column and click the Add button to add the passes you wish to generate at render time. When you render the scene, the added render elements listed in the column on the right, will also render, which can be viewed from the VFB window's channel drop-down menu.
For more information on the parameters on this dialog, see the Render Elements tab page.


Using the Denoiser
When rendering, the V-Ray Denoiser automatically adds a few render elements in the V-Ray frame buffer which are required by the denoising algorithm. Some of them are standard render elements like Diffuse and Reflection Filter. A few special render elements are also generated:
- The noiseLevel render element is the amount of noise for each pixel in greyscale values, as estimated by the V-Ray image sampler.
- The defocusAmount render element is non-black only when depth of field and motion blur are enabled, and contains the estimated pixel blurring in screen space.
- The VRayDenoiser render element, when generated, contains the final image that results from noise removal. Whether this render element is generated depends on the Mode selection.
Denoising Engines
VRayDenoiser offers a choice between the Default V-Ray denoiser, the NVIDIA AI denoiser and the Intel Open Image denoiser. Each offers a different denoising algorithm that comes with different benefits.
Default V-Ray denoiser - V-Ray's denoising algorithm. It can utilize the CPU or the GPU (AMD or NVIDIA GPUs) to perform the denoising. It is consistent when denoising render elements, as it applies the same denoising operator to all render channels. This means that it is recommended for denoising the render elements to be used for compositing back the beauty image. In addition, it comes with a Denoiser Tool, which is recommended for denoising animation by using frame blending.
NVIDIA AI denoiser - V-Ray's integration of NVIDIA's AI-based denoising algorithm. The NVIDIA AI denoiser requires an NVIDIA GPU to work, regardless of whether the actual rendering was performed on the CPU or GPU. This means that rendering on the CPU will still require an NVIDIA GPU for denoising with the NVIDIA AI denoiser and has some advantages and drawbacks compared to the Default V-Ray Denoiser. For example, the NVIDIA AI denoiser performs the denoising faster, but is not consistent when denoising render elements. This means that there will be differences between the original RGB image and the one reconstructed from render elements that are denoised with the NVIDIA AI denoiser. It also doesn't support cross-frame denoising and will likely produce flickering when used in animation.
The NVidia AI denoiser only works on Nvidia Maxwell and newer GPU architectures. If no proper devices are found, V-Ray will silently fall back to the Default V-Ray denoiser.
You can select which GPU device(s) to be used by the NVIDIA AI denoiser with the following environment variable - VRAY_OPTIX_DENOISER_PLATFORMS. For more information, see the Environment Variables page and the Getting Started with Environment Variables page.
Intel Open Image denoiser – V-Ray's integration of Intel Open Image Denoise. The Intel Open Image denoiser works with your NVIDIA GPU device by default. If the system doesn’t have such a GPU, the denoiser automatically switches to the CPU.
Attributes
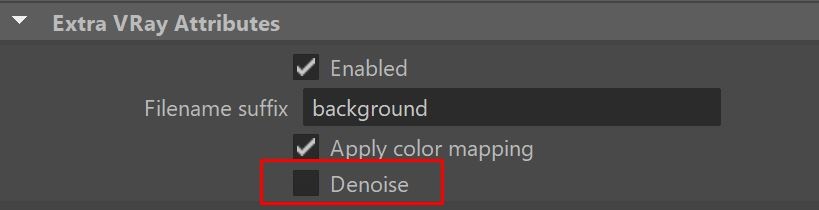
The parameters for this render element appear in the Attribute Editor under Extra V-Ray Attributes.
Enabled – Enables the render elements to appear in the V-Ray Virtual Frame Buffer.
Deep output – Specifies whether to include this render element in deep images.
Filename suffix – The text added to the end of the rendered file, when saved as a separate file (e.g. myrender.denoiser.vrimg).
Mode – Specifies how the results of VRayDenoiser will be saved.
Only generate render elements – All render elements required for denoising are generated so that denoising can be done with the Standalone Denoise Tool or the V-Ray Denoiser plugin for Nuke. The information calculated within them is not applied to other render elements, and no VRayDenoiser Render Element is generated.
Hide denoiser element – The VRayDenoiser channel is not present separately in the VFB. The effectsResult channel is generated with the denoised image.
Show denoiser element – The VRayDenoiser Render Element is generated to contain a denoised version of the RGB Color Render Element using the specified settings. The original render elements, including the RGB Color Render Element, are not changed.
Engine – Allows choosing the production denoise engine. Available options are:
Default V-Ray denoiser;
NVIDIA AI denoiser; Note that, the NVIDIA AI denoiser requires an NVIDIA GPU.
Intel Open Image denoiser.
IPR Engine – Allows choosing the denoise engine during IPR. Available options:
Default V-Ray denoiser;
NVIDIA AI denoiser; Note that, the NVIDIA AI denoiser requires an NVIDIA GPU.
Intel Open Image denoiser.
Preset – Offers presets to automatically set Strength and Radius values. Available only for the Default V-Ray Denoiser.
Default (Strength=1, Radius=10) – Applies mid-level denoising.
Mild (Strength=0.5, Radius=5) – Applies a more subtle level of denoising than the Default preset.
Strong (Strength=2, Radius=15) – Applies a stronger level of denoising than the Default preset.
Custom – Allows the Strength and Radius parameters to be set to custom values.
Strength – Determines the strength of the denoising operation. This value is automatically set by preset selection, but can be changed when Preset is set to Custom.
Radius – Specifies the area around each pixel to be denoised. A smaller radius affects a smaller range of pixels, while a larger radius affects a larger range, which increases the noise removal. This value is automatically set by preset selection, but can be changed when Preset is set to Custom.
Temporal Mode – This option is only available when the Engine is set to NVIDIA AI denoiser. When enabled, the Denoiser uses information from previous frames to create a smoother transition. Useful for rendering animation.
NVIDIA AI upscale – When enabled, the rendered image is internally calculated with half the resolution set in the render setup (in each dimension), and the denoised image is upscaled to the full resolution using NVIDIA's AI upscaling technology. NVIDIA's AI upscaling technology represents an advanced method based on machine learning which provides better and more detailed results when compared to a standard image interpolation. For example, a 3840x2160 resolution renders the image internally in 1920x1080 and the AI upscaling denoiser produces the final 3840x2160 image from the lower resolution render.
Render elements that don't have the Denoise option enabled are upscaled using simple interpolation.
It is recommended to use NVidia AI upscale option with the latest recommended NVIDIA driver.
Hardware acceleration – Uses the GPU device(s) to accelerate the denoising calculations. In case there is no compatible GPU device, denoising will automatically fall back to use the CPU, even if the option is enabled. This option is only available for the Default V-Ray Denoiser.
Denoise alpha – Controls whether the alpha is also denoised or not.
Panorama – When enabled, V-Ray considers whether the image is rendered with a spherical panorama camera with FOV of 360 degrees. This prevents visible seams caused by the denoising process.
Update – Re-apply the denoising operation when the required render elements are already present in the V-Ray frame buffer. The elements can be either generated from a render in Maya, or by loading a multi-channel .vrimg or OpenEXR into the V-Ray Frame Buffer. Use this button to apply denoising again after settings on this rollout have been changed.
OIDN Prefilter – Helps with detail retention, producing sharper and cleaner results. It adds an extra step to reduce noise in the diffuse and normal passes before the final denoising of the image. This function is only available when the production denoiser is set to Intel Open Image Denoiser. See the OIDN Prefilter example below.

Suggested Render Settings
While the denoiser can be quite effective at removing noise, it is not perfect. Very noisy images can lead to artifacts and loss of image detail. For most scenes, use the Progressive image sampler with the Noise threshold parameter set to 0.05 or lower. Additionally, the denoiser works best when the noise levels across the image are similar (when the noiseLevel channel is as close to uniform gray as possible), so using very low sampling is not recommended.
When rendering animations, disabling the Animated noise pattern option in the Image Sampler rollout generally improves the results.
Using the Standalone Denoise Tool on the rendered frames can additionally improve the quality of the animation.
You can modify the frequency at which the denoiser is updated during progressive rendering via the Post effect rate parameter located in V-Ray's Settings > System > Post effects rollout.
During IPR, the Post effect rate is set to 100 by default.
Example: Default V-Ray denoiser
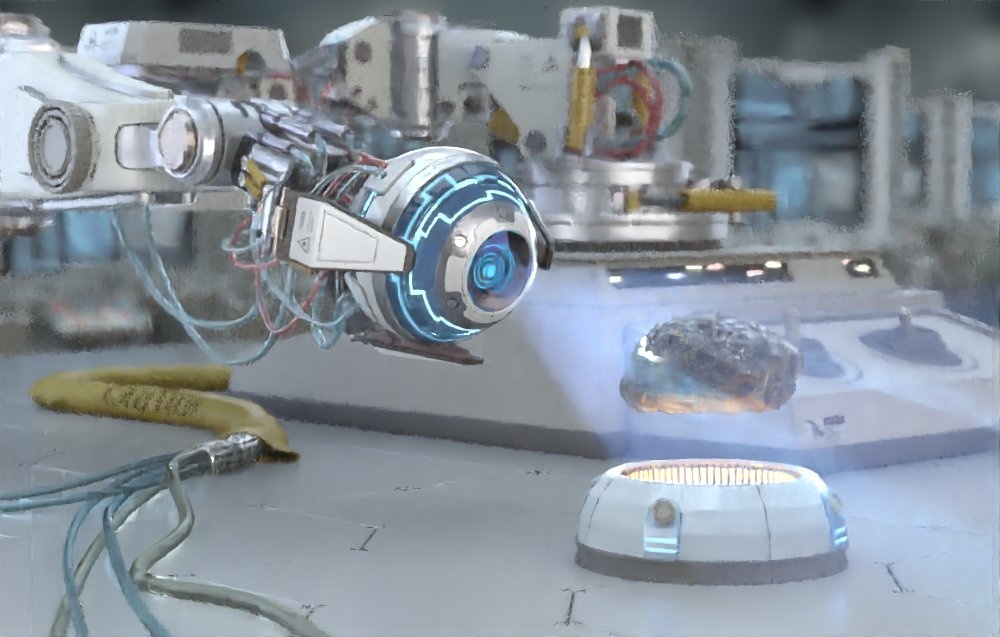
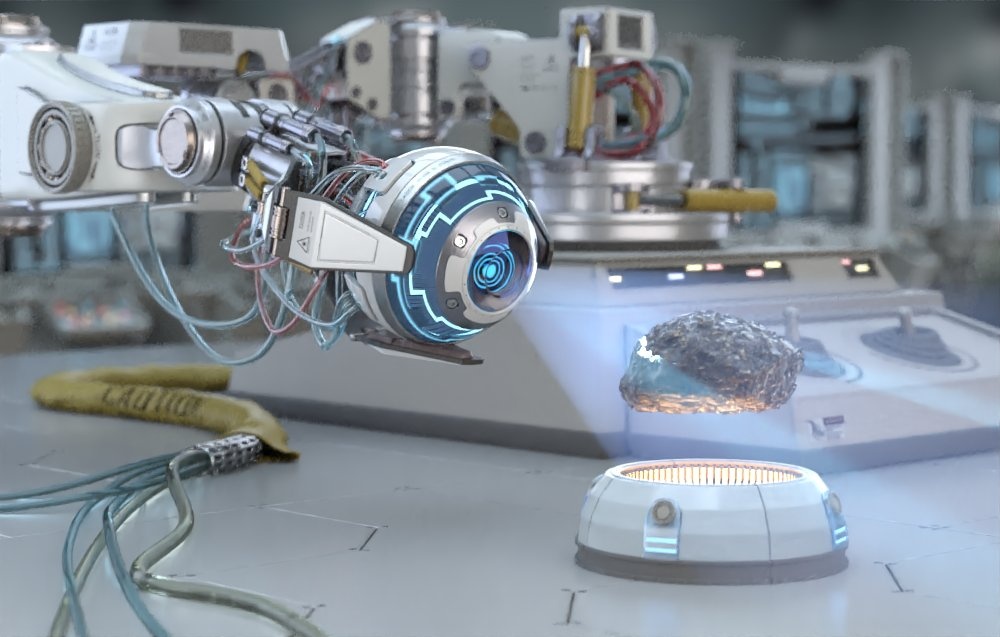
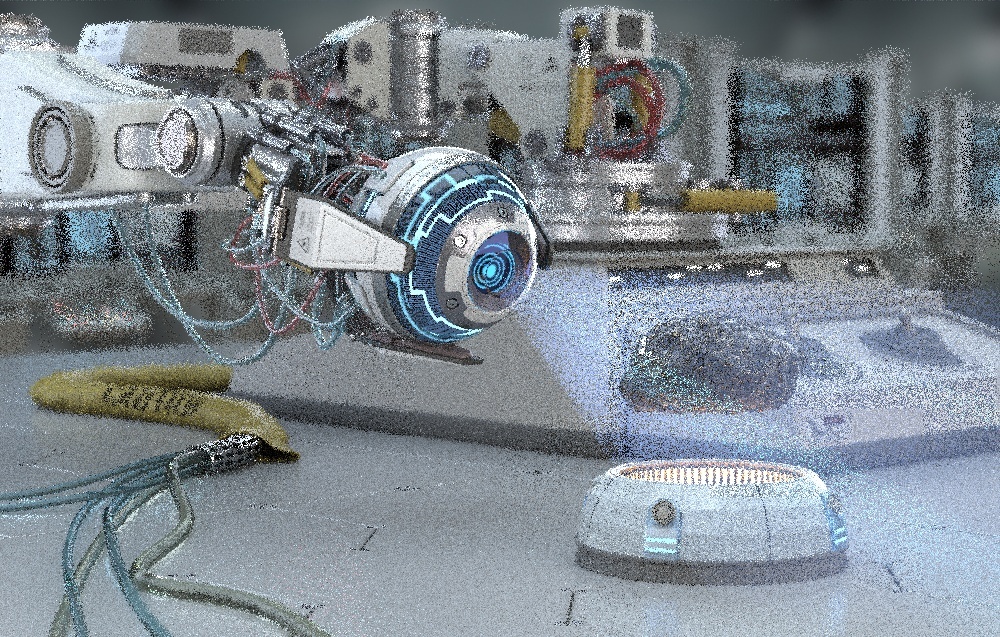
The example below illustrates how the Default V-Ray denoiser works after more samples are made with the Progressive image sampler. When the samples are too few, there's not enough information for the denoising to produce a smooth result.
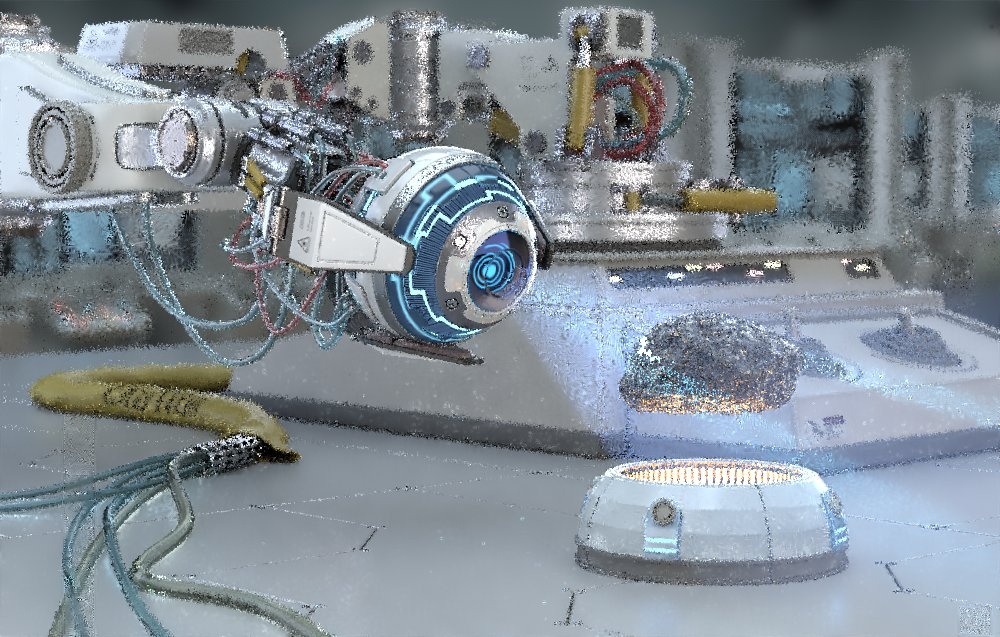
Sampling pass 1

Sampling pass 2

Sampling pass 4

Sampling pass 8

Sampling pass 16

Sampling pass 32

Sampling pass 64

The original vs. the denoised image after 64 passes.
Example: NVIDIA AI denoiser
The example below illustrates how the NVIDIA AI denoiser works after more samples are made with the Progressive image sampler. When the samples are too few, there's not enough information for the denoising to produce a smooth result.
Sampling pass 1

Sampling pass 2

Sampling pass 4

Sampling pass 8
Sampling pass 16

Sampling pass 32

Sampling pass 64
The original vs. the denoised image after 64 passes.
Example: Intel Open Image Denoiser
The example below illustrates how the Intel Open Image denoiser works after more samples are made with the Progressive image sampler. When the samples are too few, there's not enough information for the denoising to produce a smooth result.
Sampling pass 1

Sampling pass 2

Sampling pass 4

Sampling pass 8

Sampling pass 16

Sampling pass 32

Sampling pass 64


The original vs. the denoised image after 64 passes.
Example: OIDN Prefilter
For this example the Image sampler is set to: Bucket; Min subdivs = 1; Max subdivs = 2; Threshold = 0.01; AA filter = Off
The OpenImageDenoise took 1315 milliseconds in total with the OIDN Prefilter Off and 5063 milliseconds in total with the OIDN Prefilter On.

Denoising Separate Render Elements
To denoise a separate Render Element, select it from Render Settings > Render Elements > Added Render Elements.
In the Attribute Editor, go to Extra Vray Attributes and enable the Denoise option.
Some render elements don't have a Denoise option, as they don't produce color information. For this reason, it makes no sense to denoise them, as this would distort the data. For example, ZDepth and Velocity data doesn't need denoising, just like masks like the Cryptomatte or the MultiMatte don't either. For more information, please see the respective render element page.
Denoising Animations
When denoising animations, it is recommended to use the Standalone Denoiser Tool. Unlike the denoiser integrated in the UI, the standalone tool can do frame blending for animations, which reduces flickering. The integrated denoiser only works on the rendered frame and does not take the next and previous frame(s) into account, like the standalone tool does.
To denoise an image sequence with vdenoise run the following command:
vdenoise -inputFile="path\to\sequence_????.ext
where the question mark (?) replaces the digits in the sequence's file names.
For example, if the images in the sequence are named anim_0001.exr, anim_0002.exr, etc. and are located in the folder c:\renderoutput, the full command will be:
vdenoise -inputFile="c:\renderoutput\anim_????.exr
When that command is run, the sequence is read and for each frame, the specified number of adjacent frames are also considered. A new output image is then written for each frame.
Recommended settings:
- Мode set to only generate render elements.
- denoising engine set to Default V-Ray denoiser.
- Render output set to vrimg or multichannel exr.
The NVIDIA AI denoiser does not perform frame blending and will likely produce flickering when denoising animations.
Denoising in IPR
When denoising IPR renders, it is recommended to use the NVIDIA AI or the Intel Open Image denoiser. Both of the engines ensure fast denoised results.
To use the denoiser in IPR with the VFB, add a Denoiser render element and select an IPR Engine.
Alternatively, you can add a Denoiser render element inside the VFB. Open the Denoiser Layer from the Layers tab. Click on the Add Denoiser to the scene option. Start a new render to apply the changes.
To use the denoiser with Viewport IPR:
Start V-Ray IPR in the Maya viewport using the V-Ray logo icon in the viewport:

Enable the viewport denoiser by clicking the Denoiser icon (
 ) next to the V-Ray logo.
V-Ray Viewport IPR only uses NVIDIA AI Denoiser.
Notes
Image denoising takes place after the frame has been rendered, so the results of denoising will not show up until all rendering has finished.
Textures or materials such as VRayStochasticFlakesMtl that could be considered to have a purposely noisy look are not considered "noisy" by vrayRE_Denoiser, and are not affected by the noise removal process.